

PUTTING IT ALL TOGETHER AND CHEAT SHEETS
We have covered a lot of information in the course, and I wanted to take a little time to put it all together. There’s one fantastic thing about what you’ve learned so far: it’s easy to apply it to any type of photography you’re interested in. Whether you want to photograph the Milky Way at night or a hummingbird in flight, you can find camera settings that fit your needs.
In the cheat sheets below, I’ve suggested settings for several types of photography. Keep in mind that the suggested settings are just a starting point. You’ll still need to adjust them for your location, preferred subjects, and personal style. Remember to always be experimenting!
LANDSCAPE IMAGES CHEAT SHEET
In landscape photography, depth of field is key. You want all aspects of your image to come through sharp and clear, from your foreground to your background.
- Aperture – f/11 – f/16 to produce the depth of field needed.
- ISO – 100-200 ISO to produce a clean image without a lot of noise.
- Shutter Speed – Use shutter speed to balance your exposure: shorter in broad daylight, longer at dawn or dusk. If it’s windy, or there’s running water in your shot that you want to freeze, balance exposure with ISO instead.
- Mode – Aperture Priority or Manual.
- Auto Focus – Single Point.
- Tripod – Yes, to get a sharp, steady image.
- Remote – Yes. Pushing the shutter button with your finger moves the camera a little, resulting in a less clear shot.
- White Balance – Auto. On most modern cameras, auto white-balance works great Also try Sunny, Shade, or Cloudy, depending on the environment.
- Flash – Not normally. However, if the foreground is poorly lit, a little flash can help.

Depth of field is the critical value in landscape photography. In this example, the fence is a leading line to the mountains, so it must be in focus. I set my Aperture small at f/16, and compensated with a slower shutter speed.
The Technical Details: Focal Length 28mm, Shutter Speed 1/2.5sec, Aperture f/16, ISO 200, Exposure Program Aperture Priority Mode
BIRDS IN FLIGHT CHEAT SHEET
Birds in flight are very fun to photograph. A good bird photo captures mood, grandeur, and fast-moving action. To get a bird photo right, we need to use a fast shutter speed. We also want a much shallower depth of field so the background doesn’t distract from the subject.
- Shutter Speed – 1/1600 to 1/3000, depending on the speed and size of the bird.
- Aperture – f/5.6 or f/4.0 depending on the bird’s size. Birds with a wingspan over 5 feet, such as my beloved bald eagles, need a little more depth of field. If you have extra light, bring your f/stop up to f/8.
- ISO – Balance your exposure with ISO. About 800 should compensate for the Aperture and Shutter Speed you need. Beware that some cameras start to get a little noisy around ISO 800, so to be on the safe side, lower your ISO if you have a little extra light.
- Mode – Shutter Priority or Manual Mode.
- Auto Focus – Many points with continuous tracking. The smaller the bird, the more points. You can use fewer points once you get better at capturing birds in the frame.
- Tripod – Optional. Not needed unless you’re using a long lens. Try a gimbal head tripod to balance the weight of those long and heavy lenses.
- Remote – No.
- White Balance – Auto. You can also try Sunny, Shade, or Cloudy depending on the environment.
- Flash – No. Some photographers like a little fill-flash on their wildlife, but I find it disturbs the bird and makes its eyes look unnatural.

To capture fast-moving birds in flight, you need a faster shutter speed. Smaller birds move faster than larger birds, so I normally start at 1/2500 for the smaller ones, and 1/1600 for the larger. In this photo of a northern gannet, I opened up the aperture to soften the background. By choosing a slightly higher ISO than usual, I accepted a little noise in exchange for extra light that let me raise the shutter speed.
The Technical Details: Focal Length 500mm, Shutter Speed 1/2000sec, Aperture f/5.6, ISO 800, Exposure Program Shutter Priority Mode
SPORT IMAGE CHEAT SHEET
Photographing sporting events can be highly rewarding. Each event provides a new challenge, whether it’s little league baseball or professional football. Human athletes are also much more appreciative than birds, who never stick around to see how the shot turned out!
Because different sports are played in diverse environments, you’ll need to adapt these settings more than the others; however, this cheat sheet will provide you with a starting point.

Sports photography requires a balance between action and depth of field. In this example, I wanted to freeze the action to give a sense of the spatial relationships between the horse, rider and skier. If you look closely at the skier, you’ll see a bit of motion blur, which I left in to show how fast he was going. I chose a relatively narrow aperture to capture the depth of the scene.
Review your images as you go to see if you’re getting the right balance of motion and depth. There’s nothing worse than shooting a whole event and only discovering afterward that all your settings were off.
The Technical Details: Focal Length 380mm, Shutter Speed 1/500sec, Aperture f/9.0, ISO 400, Exposure Program Shutter Priority Mode
PORTRAIT IMAGE CHEAT SHEET
The key to portrait photography is nice lighting and a soft background. Use shallow apertures that turn the background neutral and unfocused, ensuring the viewer’s eyes go directly to the subject. I recommended steady lighting for indoor portraits. A flash can also be a good idea.

Notice how the shallow depth of field produces a neutral background that doesn’t distract from the subject. I used a light flash for this image, so I set the shutter speed at 1/250, the maximum speed that wouldn’t put the flash out of sync. A low ISO balanced out the wide Aperture and produced a noise-free image.
The Technical Details: Focal Length 30mm, Shutter Speed 1/250sec, Aperture f/2.8, ISO 125, Exposure Program Manual Mode
WATERFALL IMAGE CHEAT SHEET
What do you do when your subject is as tall as a sequoia, but moves as fast as a professional quarterback? Welcome to the sublime challenge of waterfall photography.
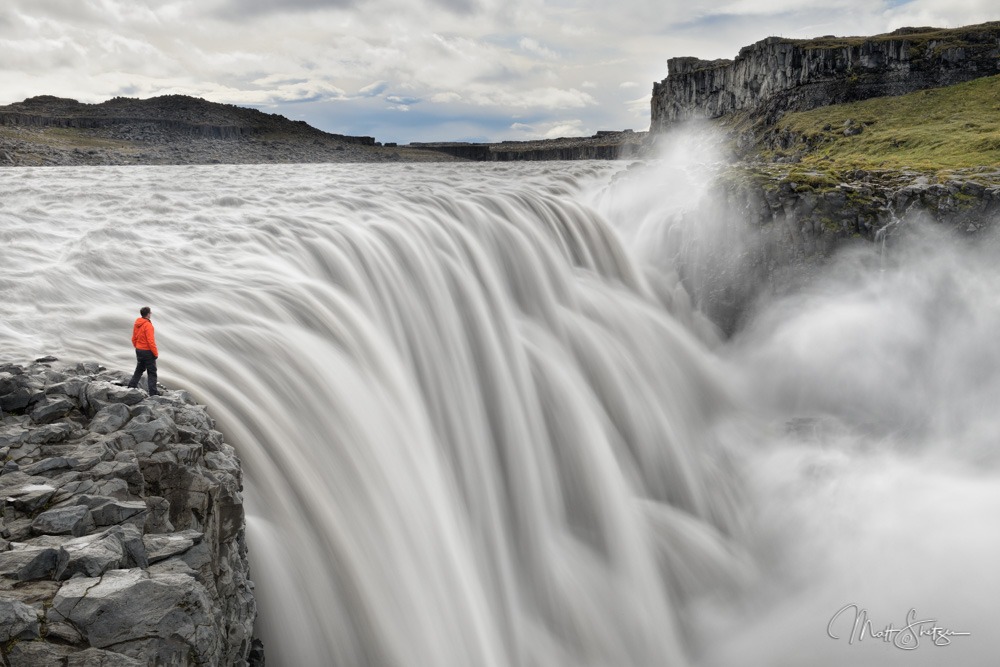
Waterfall photos are a great way to show your creativity. Experiment with different shutter speeds to find the look and feel you prefer. I intentionally composed this image to include the person in the orange jacket, giving viewers a sense of the massive scale of this Icelandic waterfall.
The Technical Details: Focal Length 40mm, Shutter Speed 1 second, Aperture f/16, ISO 400, Exposure Program Aperture Priority Mode
I hope these examples help take the mystery out of different types of photography. Make sure not to take the cheat sheets as gospel: experiment with different settings to create your own personal style.
After shooting, take time to review your images and settings. Each photograph helps you fine-tune your style. Keep an eye out for motion blur (shutter speed), depth of field (aperture), and noise (ISO) in your images.
It goes without saying that there are other kinds of photography than the ones I’ve provided cheat sheets for here. For example, consider how you’d set your camera to capture the Northern Lights, a performer onstage at a concert, or a geyser in mid-eruption.
Photography is all about discovery. So get out there and shoot!
Want More?
Once you have finished, you might be craving more chances to test your skills. During our photography workshops, we go in-depth and teach our guests advanced techniques in the world's most beautiful locations, like Alaska, Costa Rica, Iceland, Colorado and Ecuador.
Each workshop has different topics and skill sets that are dedicated to the subjects at each spectacular location.
Learn more about our Photo Workshops at: https://www.shetzers.com/photo-tours/