
COMPOSITION (PART 1)
For the last three chapters, we’ve been covering technical knowledge: the meanings of your camera’s settings and how to get the most out of each one. You can call those first three units “photography as a science.”
This chapter is different. Consider these topics “photography as an art.” It’s easy to tell when a photo is overexposed or poorly color-balanced. It’s much harder to get a handle on what makes good composition. However, just because things are more subjective, doesn’t mean there aren’t rules to follow (and rules to break).
This is where getting critique from other photographers – especially seasoned artists – becomes even more important. Most of us can spot technical mistakes in our own work, but we’re a bit too close to our photos to know when we could have made better composition choices. Now more than ever, don’t be afraid to show others your work and ask for honest feedback.
LESSON 1: TELL A STORY
Not every picture is worth a thousand words. You’ve probably seen many pictures in your life that don’t tell you much of anything. A pretty sunset is nice, but where are you seeing it from? Who else is watching it? What is the sun setting over? What shadows is it casting?
Let’s compare two pictures. The first one shows two bald eagles tussling in midair. It’s a technically proficient action shot, but it doesn’t tell us anything about the eagles. We don’t know why they’re fighting, or how serious the battle is.
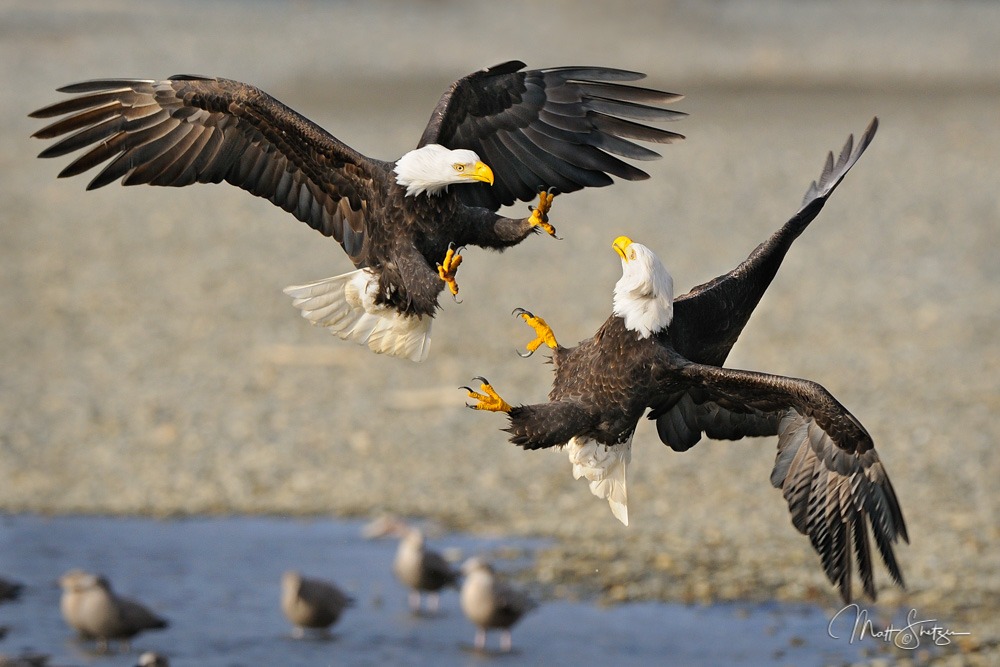
This would be a stronger image if we knew why the eagles were fighting. By zooming in too tight, I cut the fish out of the bottom of the frame, resulting in a weaker photo.
The Technical Details: Focal Length 500mm, Shutter Speed 1/1250sec, Aperture f/5.6, ISO 400, Exposure Program Manual Mode
Now take a look at this next shot. Is there a better sense of story here?

Bald eagles come to Haines, Alaska each year to feed on the late salmon run. By capturing the fish in the shot, we know why they’re here and what they are fighting over – the very food they need to survive.
The Technical Details: Focal Length 500mm, Shutter Speed 1/1250sec, Aperture f/8, ISO 1250, Exposure Program Manual Mode
The addition of the fish changes everything. Giving the two eagles something to fight over transforms a scene into a story.
The viewer begins to ask questions.
- Who saw the fish first?
- Who won the fight?
- Are these eagles hungry?
- Do they only want the fish because the other one wants it?
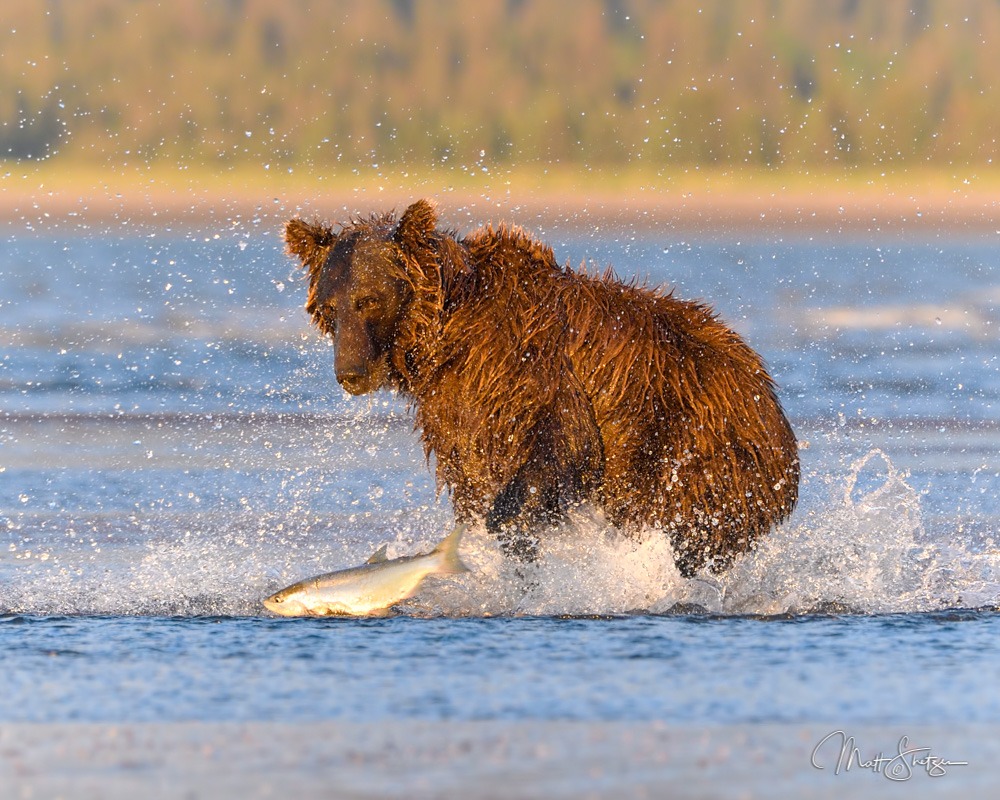
Why is the bear in the water? By capturing the fish along with the grizzly, we can visualize how both of them got here.
The Technical Details: Focal Length 400mm, Shutter Speed 1/800sec, Aperture f/7.1, ISO 2000, Exposure Program Manual Mode
Think about the most famous photographs in history — pictures like “V-J Day in Times Square,” “Lunch Atop a Skyscraper,” or “Migrant Mother.” They outlasted millions of other photographs because they told a story.
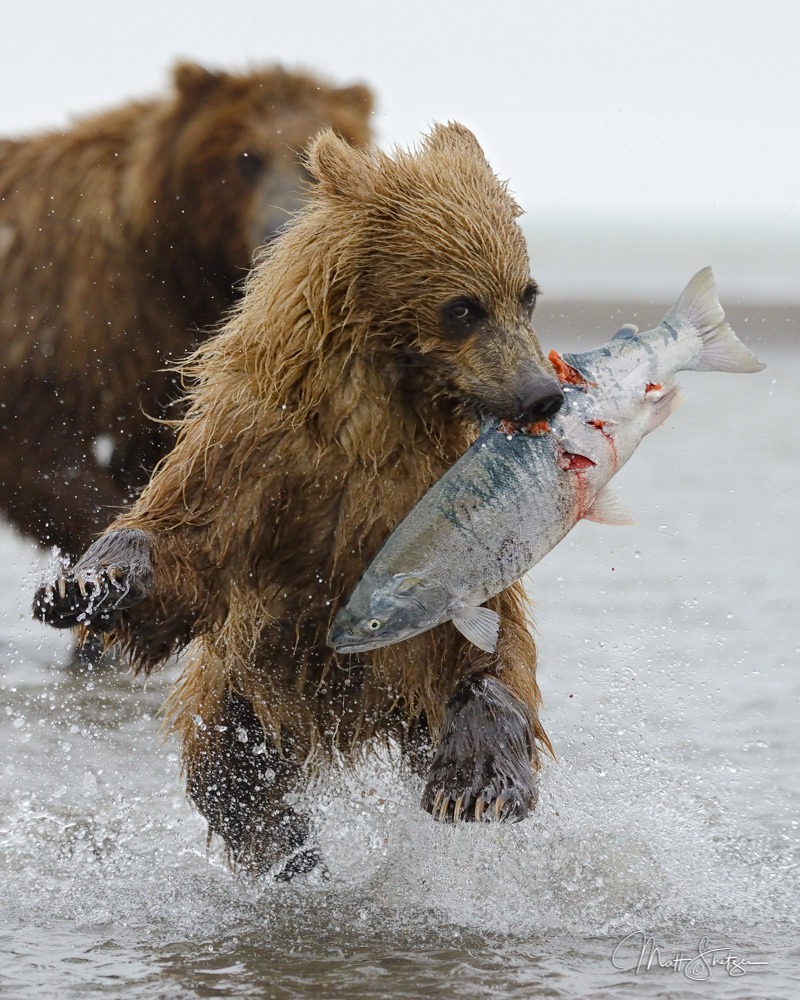
I stole Mom’s fish! Showing a young cub with a catch is nice, but by including its mother in the image, we have a complete, charming story. Making eye contact with the cub also helps (more on that later).
The Technical Details: Focal Length 260mm, Shutter Speed 1/1000sec, Aperture f/6.3, ISO 1600, Exposure Program Manual Mode
Quick Tip
In every photo you take, include objects that tell a story.
LESSON 2: THE RULE OF THIRDS
I observe one common mistake in the early work of almost all untrained photographers: they put everything in the center. New photographs assume the eye is drawn to the middle of the image, when in fact, the viewer’s gaze naturally settles closer to the edges.
The photo below has been divided into three equal parts horizontally and vertically. Examine it closely, and figure out where the photographer (that’s me) has placed the content most important to the story.
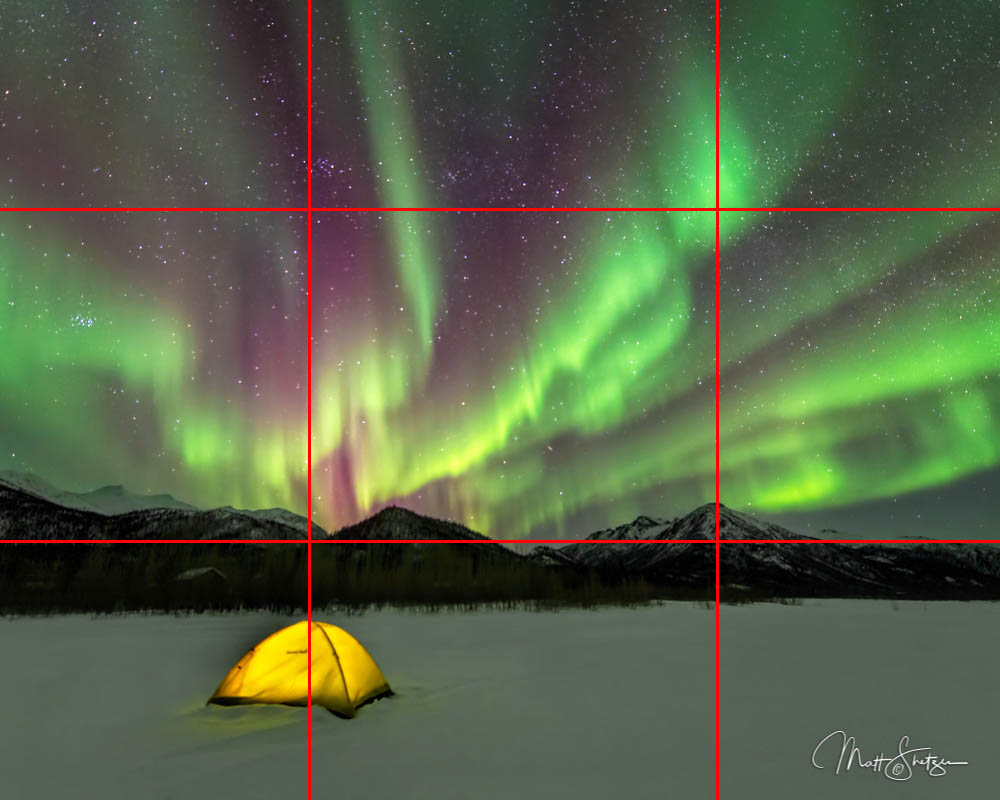
The tent and the sky are the most interesting parts of the image. Placing the horizon on the bottom third line balances the image, allowing the Northern Lights to shine in the top two thirds.
The Technical Details: Focal Length 14mm, Shutter Speed 8sec, Aperture f/2.8, ISO 3200, Exposure Program Manual Mode
The tent draws your eye first. However, it’s not in the middle of the frame. Instead, it sits almost perfectly atop one of the vertical lines dividing the picture into three parts.
Now look at the mountain range. Your first instinct might be to place it in the center, but since we’re in the middle of an Aurora Borealis light show, the sky is much more interesting than the ground. I chose to place the mountains on the lower of the two horizontal lines that divide the photograph into three.
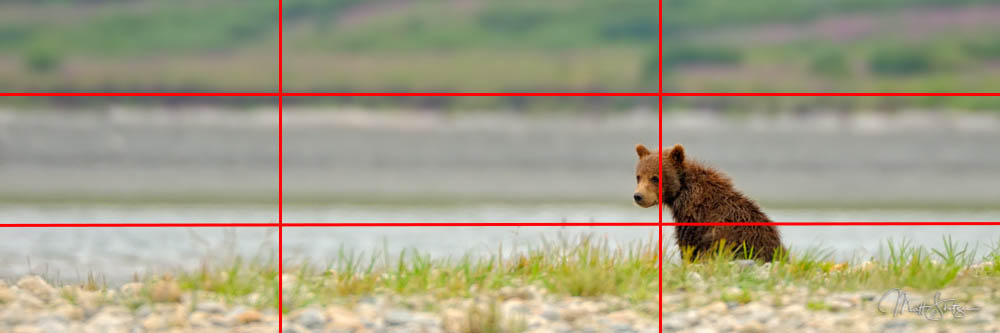
By applying the rule of thirds to this photograph, I could pinpoint the best place to locate the little bear. Note that the bear is looking into the center of the frame, not out, which is always the best policy with living subjects.
The Technical Details: Focal Length 550mm, Shutter Speed 1/400sec, Aperture f/6.3, ISO 400, Exposure Program Manual Mode
The Rule of Thirds is the quickest, easiest way to compose a picture so it looks balanced and visually pleasing. The best thing about it is that it takes no time at all. Even if you have seconds to snap the picture, you can align its most important elements along the lines dividing the picture into three.
Quick Tip
When lining up a photograph, mentally divide the scene into three horizontal and vertical parts. Place the most important subjects on one of the dividing lines. Some cameras give you the option to display the rule of thirds lines in the eyepiece.
LESSON 3: ODD NUMBERS
Picture a three-legged stool. No matter what direction you turn it, it never wobbles. Even if one of the legs is shorter than the other two, it can still stand without shaking. Add a fourth leg, though, and suddenly the stool can tip back and forth.
The Rule of Odds in photography is related to the Rule of Thirds. Just like stools, odd numbers of subjects balance more easily. It’s easier to compose a photograph with one, three, or five objects than it is to capture two or four.

These five eagles balance in the frame very well. There were actually six eagles in the originally image, but I cropped out the sixth in order to achieve better balance.
The Technical Details: Focal Length 500mm, Shutter Speed 1/125sec, Aperture f/11, ISO 500, Exposure Program Manual Mode
Obviously, you won’t be able to apply this rule in all cases. If you want to take a photo of your wife and three kids, I don’t advise cropping any of them out. But you have control over the Rule of Odds when it comes to still objects and wildlife, both at the moment of exposure and on your computer after the fact.
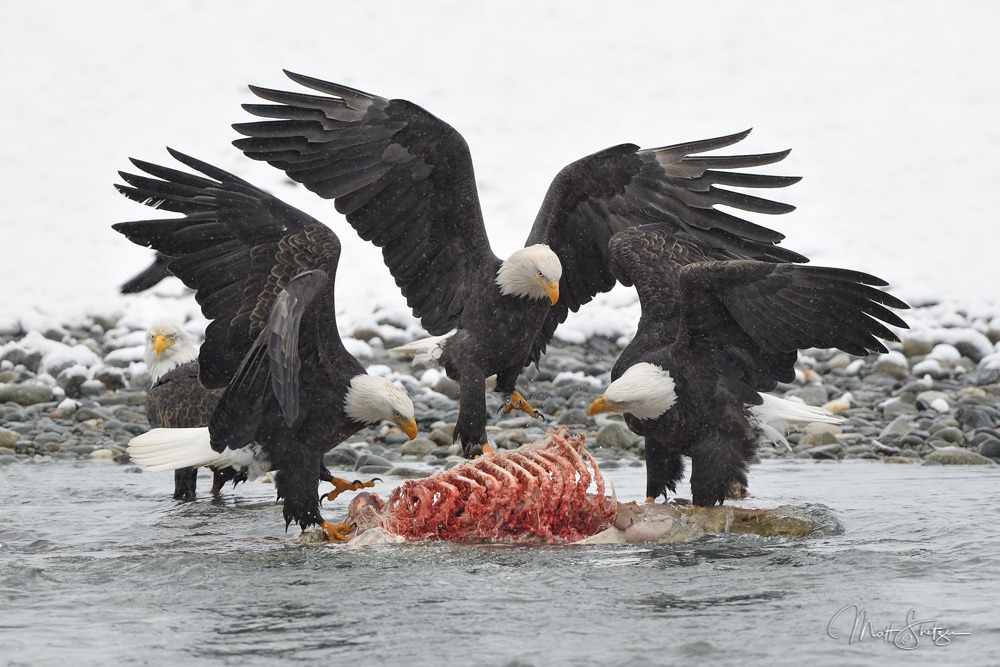
The three bald eagles on the bear carcass provide a nice balance that fills the frame.
The Technical Details: Focal Length 600mm, Shutter Speed 1/1000sec, Aperture f/5, ISO 2000, Exposure Program Manual Mode
Quick Tip
Compose your photos with odd numbers of subjects to achieve a more balanced image.
LESSON 4: BACKGROUNDS
Finding an attractive background is key. Sometimes the difference between a great image and a good image is the background.
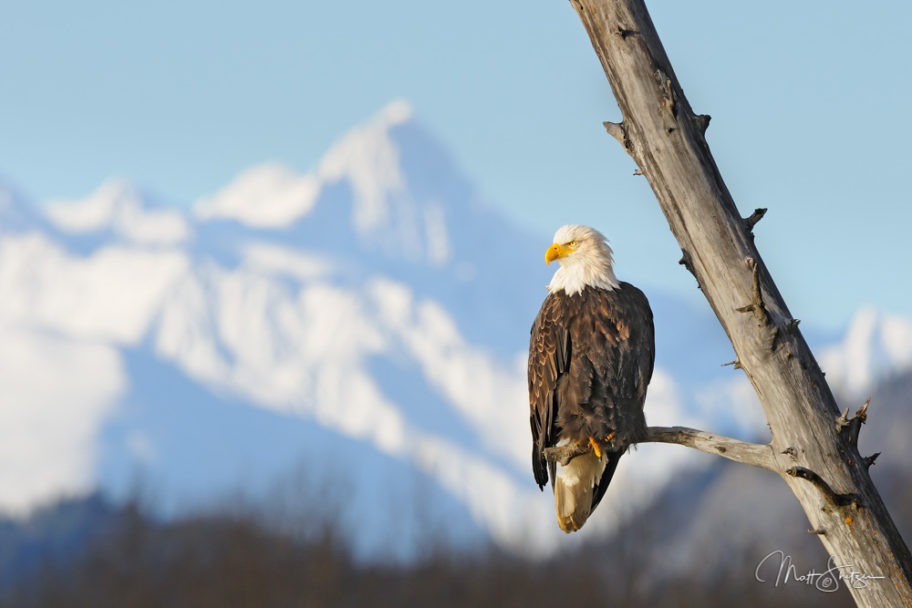
To take the image below, I positioned myself so that the distant mountain filled the dead space in the frame. That let me place the eagle on the right-hand third line, looking into the frame, without too much empty sky unbalancing the picture.

Example of how a background can make or break an image. If the eagle was set against a blank white sky, the picture would be empty and boring. Instead, the mountain fills the dead space and balances the composition, while the treeline helps define the eagle’s shape.
The Technical Details: Focal Length 500mm, Shutter Speed 1/320sec, Aperture f/9, ISO 200, Exposure Program Manual Mode
The photograph above also employs a shallow depth of field. By softening the background, it becomes a tool to emphasize the subject, rather than a subject in its own right.
Let’s look at another example of how background and DOF interact.
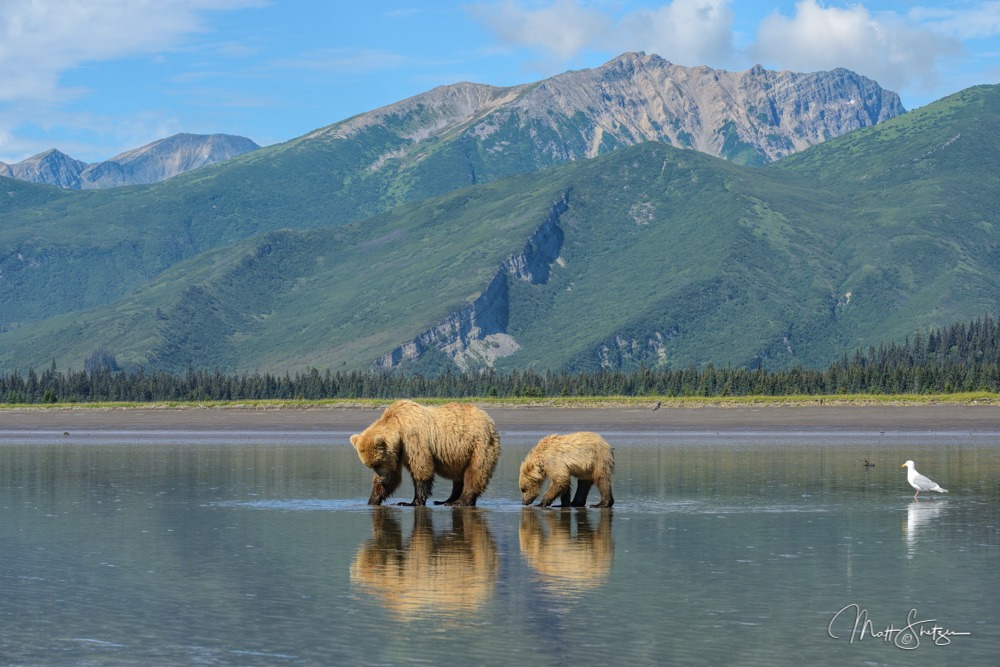
A shallower depth of field helps the viewer focus more on the bears and less on the background scenery.
The Technical Details: Focal Length 95mm, Shutter Speed 1/1250sec, Aperture f/10, ISO 640, Exposure Program Aperture Priority Mode
In this image, the grizzly bears are our primary subject. If the background was tack-sharp, it would draw your focus in too many directions, and the bears would have less of an impact.
Notice the seagull, too. While technically in the foreground, it also serves as scale for the bears, giving us a sense of how big they are. When composing your background, look for objects that help the viewer understand the scale of your main subject.
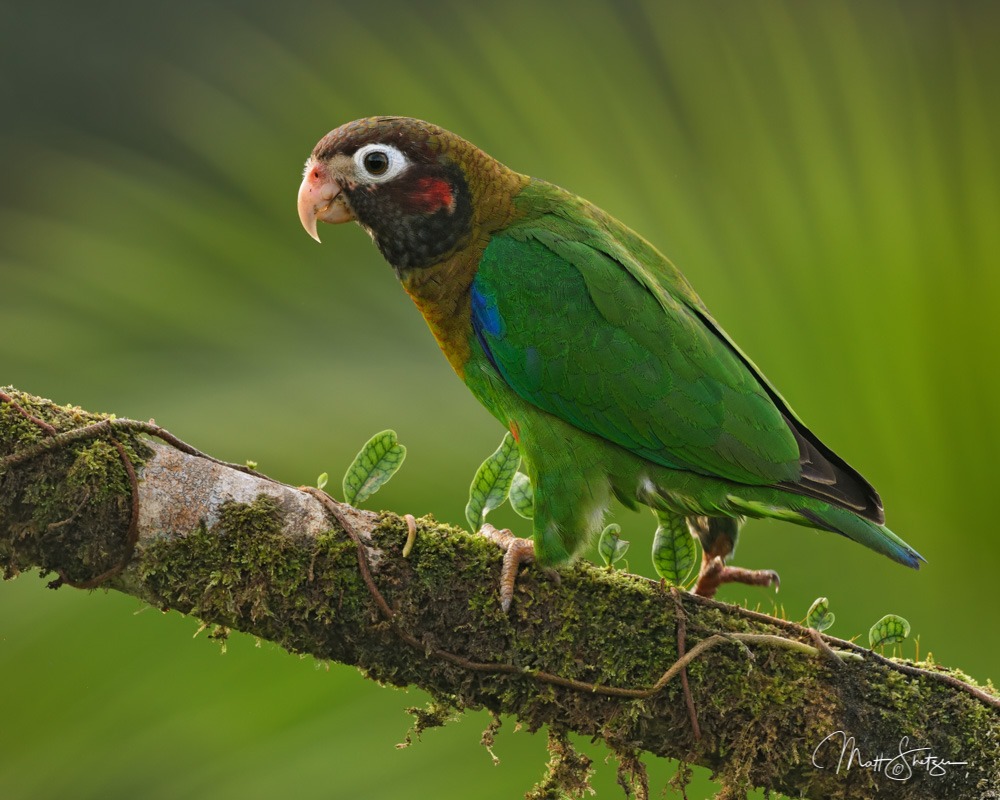
The background of this image adds to the viewer’s experience without distracting from the parrot.
The Technical Details: Focal Length 500mm, Shutter Speed 1/200sec, Aperture f/7.1, ISO 640, Exposure Program Manual Mode
As you compose your image, move left, right, up, and down until you’ve found the best background. Sometimes just moving a couple of inches drastically changes your composition. This is one of my favorite techniques to experiment with, since no two backgrounds are exactly alike.
Quick Tip
Choose a background that enhances your subject without distracting from it.
Want More?
Once you have finished, you might be craving more chances to test your skills. During our photography workshops, we go in-depth and teach our guests advanced techniques in the world's most beautiful locations, like Alaska, Costa Rica, Iceland, Colorado and Ecuador.
Each workshop has different topics and skill sets that are dedicated to the subjects at each spectacular location.
Learn more about our Photo Workshops at: https://www.shetzers.com/photo-tours/