
ISO, WHITE BALANCE, AND EXIF
In the last course, we talked about aperture, shutter speed, and other fundamental camera settings. Now that you have got that foundation under you, this chapter will introduce a couple of slightly more complicated tools.
Owner’s Manual Alert! Have your camera’s owner’s manual somewhere you can find it during this chapter. You’re going to need it for your homework. If you threw it away (I won’t judge), you can find it online by Googling your camera’s model number.
LESSON 1: ISO – LIGHT SENSITIVITY
ISO (pronounced “ice-o”) stands for International Standards Organization. Back when all photography was done on film, this group set numerical definitions for how sensitive different types of film would be to light. A low-sensitivity roll of film was called ISO 100, while an extremely sensitive roll was rated ISO 800.
Almost all photography is now digital, but the ISO unit has stuck around. Instead of the sensitivity of film, ISO now measures the sensitivity of digital light sensors in your camera. As in the old days, lower numbers equal less sensitivity, while higher numbers equal more.
But what do we mean by sensitivity? It’s a measure of how much light it takes to complete an exposure (i.e. one single photograph). With highly sensitive sensors, your camera needs much less light to take a picture than it does with low-sensitivity, low-ISO sensors.
Once you understand what ISO means, the next step is to learn what situations demand high vs. low ISO. It’s very similar to aperture and shutter speed. While aperture determined how much light gets in through the lens aperture hole, shutter determines how long the exposure is, ISO determines how much of the available light your camera uses. In low light, you’ll want a high ISO, while well-lit photos can use a lower ISO.
Quick Tip
Lower ISO number = less visible noise = less light sensitivity = use in higher light
Higher ISO number = more visible noise = more light sensitivity = use in lower light
Higher ISOs let you shoot with faster shutter speeds, and/or narrow your aperture for more depth of field. However, be careful not to use too high an ISO setting. If you take a photo with high light sensitivity in a well-lit environment, it will come out as grainy, muddy, and visually cluttered. Photographers refer to this kind of clutter as noise.
Just like we used stops of light to measure aperture and shutter speed, we’ll also use them to make sense of ISO. Each doubling of the ISO value represents one more stop of light. ISO 400 is one stop brighter than ISO 200, which is one stop brighter than ISO 100.
Each camera model handles high ISO differently. Typically, full-frame cameras can process high ISO settings better than crop-body cameras. This is one reason it is important to know what you intend to shoot before purchasing a camera. Like with any tool, the first step is to understand the job.
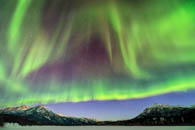
When ISO is set too high, noise increases to the point where an image can become unusable. Notice how the areas of darker colors and less detail have more noise.
The Technical Details: Focal Length 300mm, Shutter Speed 1/1600sec, Aperture f/5.6, ISO 8000, Exposure Program Manual Mode
ISO CAMERA SETTINGS
Because each camera performs differently at each ISO level, it’s good to get some practice with all your ISO settings. Try each ISO level in various lighting situations and see how much noise you get.
Eventually, you will need to shoot with ISO 800 or even 1600, so it pays to lose your fear of high ISOs early on. Just explore for now — in the assignment in the end of the chapter, I’ll direct you to take on some more complex ISO tasks.
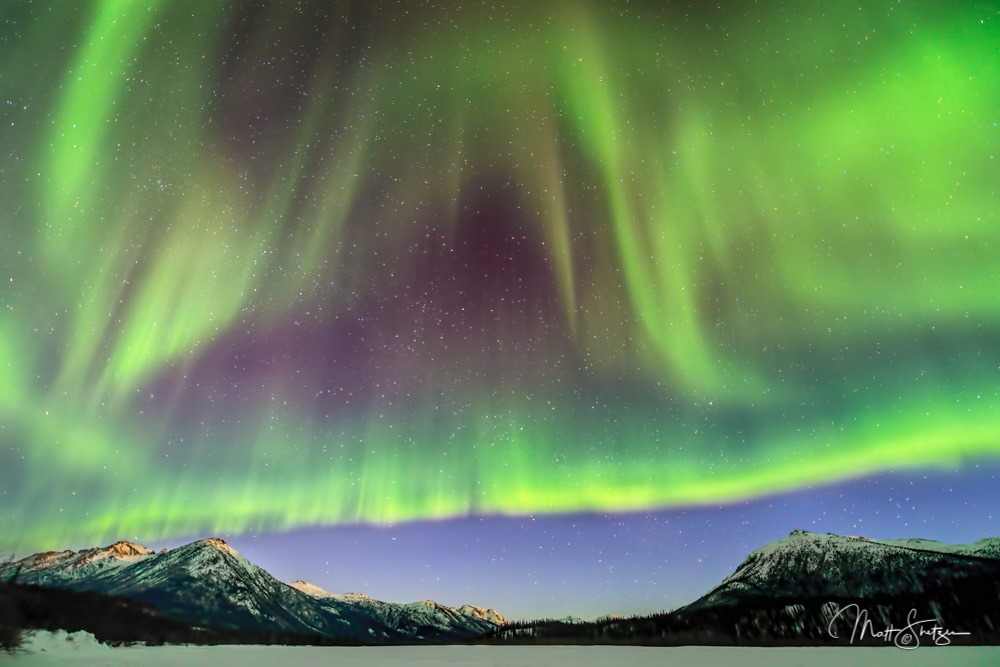
Knowing what quality (noise) your camera produces at different ISO’s makes you a better photographer. In this sample image, I knew that ISO 1600 on this camera (Nikon D4) produced a clean enough image. By using this high ISO producing more light for the sensor, I was able to shorten my shutter speed to 15 seconds to capture the curtain of the aurora as it came down to the mountains.
The Technical Details: Focal Length 14mm, Shutter Speed 15sec, Aperture f/2.8, ISO 1600, Exposure Program Manual Mode
Here are the typical ISO settings found on most cameras:
| ISO Setting | Noise Levels |
| ISO 100 or 200 | Low noise. When they have enough light, photographers almost always opt for the lowest numeric ISO setting — this is called “native ISO” since it approximates natural light. It’s best for stationary subjects shot with good lighting, such as a well lit landscape. |
| ISO 400 | At this setting, you might begin to see some noise in your image. I use it on overcast days when I need to shoot with more of the available light. |
| ISO 800 | Noise becomes more visible. This setting is best for indoor or pre-dawn/dusk photographs, and situations where you need a very fast shutter speed — e.g. sporting events or taking pictures of fast wildlife. |
| ISO 1600 and above | Any setting equal to or greater than ISO 1600 will have a lot of visible noise. These are best for indoor photos, low-light photos, and photos where you need both a narrow aperture and a high shutter speed. You can also use high-ISO settings to add a bit of grain\noise for artistic reasons. |
Let’s add ISO to our Balancing Act graphic from the first chapter. I really want you to understand that ISO, Aperture and Shutter Speed all add and reduce light on the same increments (stops). Increase one, and you must decrease one or both of the others to compensate.
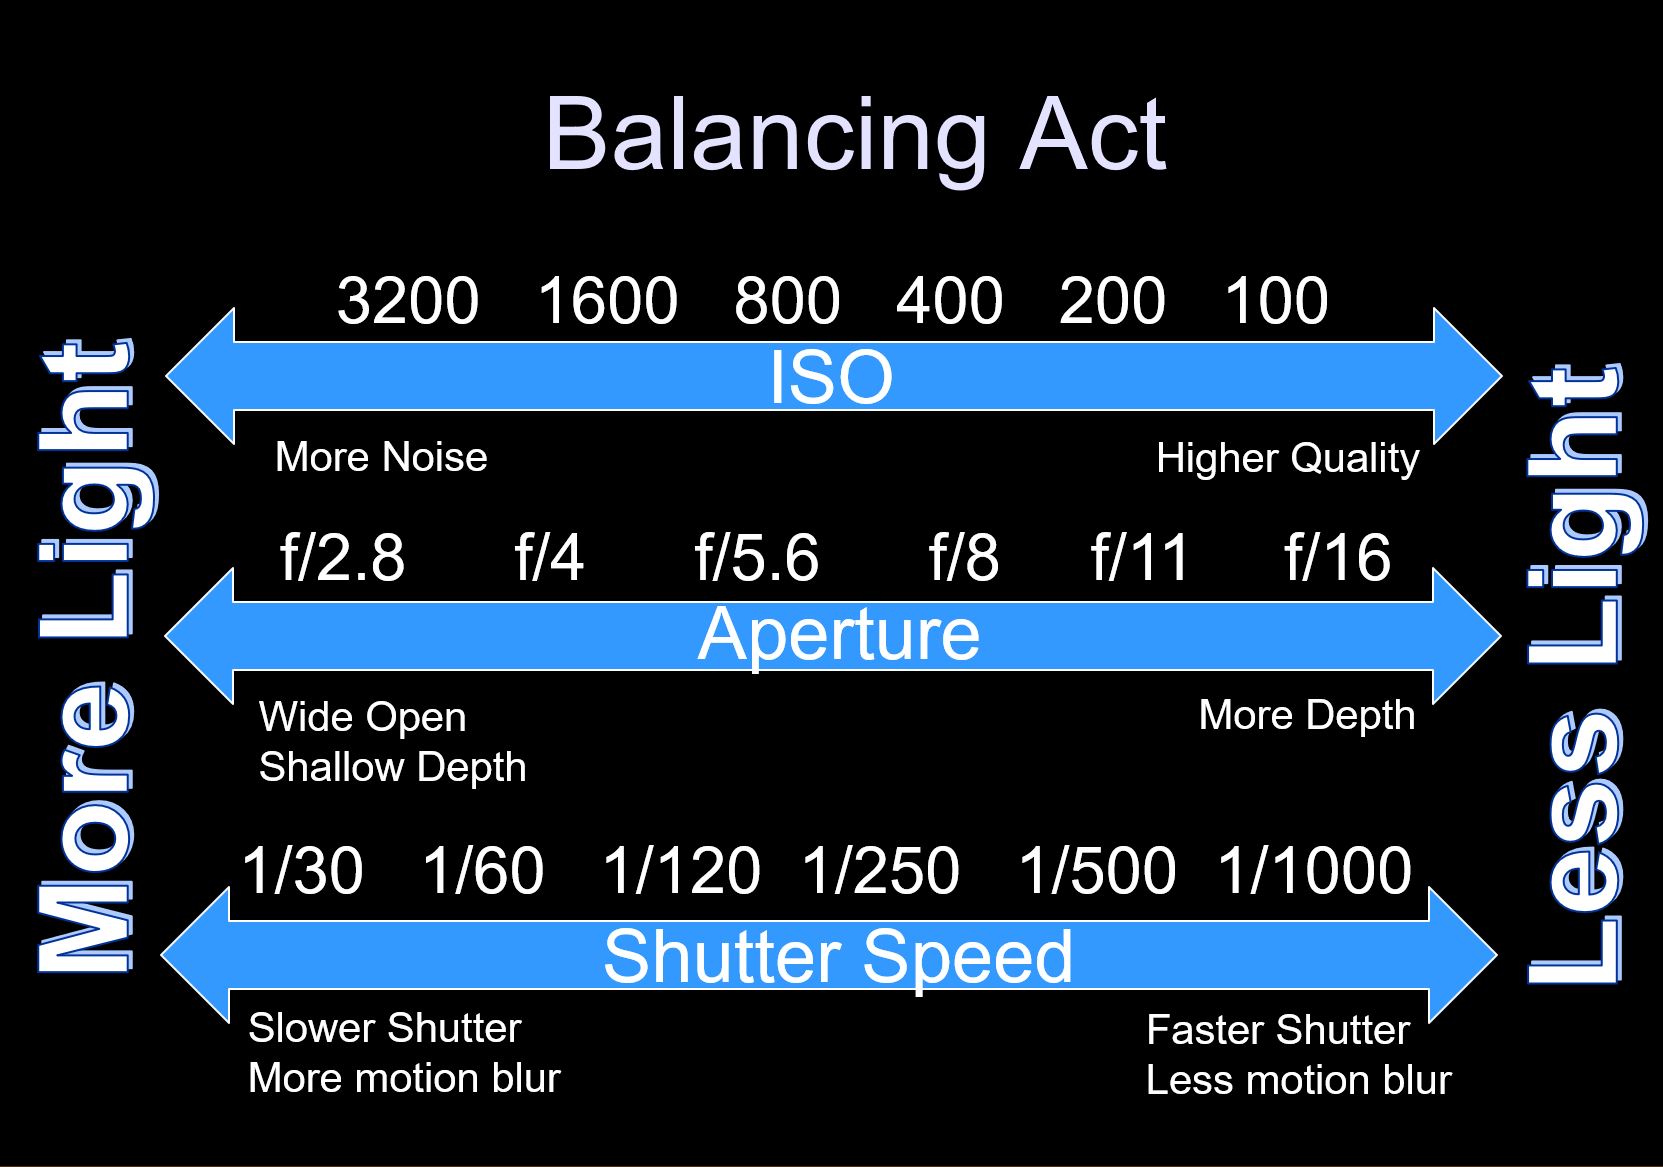
Photographers call this the “exposure triangle.” It’s one of the hardest things for a new photographer to get, but when it clicks into place in your brain, it feels amazing.
If you’re interested in an early lesson on post-processing, take a minute to read about techniques you can use to compensate for visual noise caused by high ISO.
LESSON 2: WHITE BALANCE – REFLECTING THE REAL WORLD
For most of this course so far, we’ve just been talking about light. Now it’s time to separate the light spectrum into its different colors.
White balance, alternately called color balance, is the idea that the subjects of your photographs should appear the same color they are in the real world. If something is white, it should be white in your picture. Hence, “white balance.”
If your camera’s white balance is off, you run the risk of your subjects looking weird and unreal. For example, if you shoot a snowy landscape with poor white balance, the snow might come out looking green.
Your camera typically has an auto white balance (AWB) setting. This will try to find the right white balance you need, based on the amount of light available. However, AWB works well in most situations, but not all. When you notice AWB is not working well, you’ll get much better results by setting your color balance manually.
Color temperature is measured in K, which stands for Kelvin. Most cameras will let you manually choose a K value, but also include several predetermined white balance settings, sometimes expressed as icons. Your owner’s manual can help you translate these.
CHOOSING A COLOR BALANCE
Take a look below at the following photographs of Delicate Arch in Utah. Each one is the exact same image. I’ve altered the base image with different white balance settings in post-processing, to simulate how they might look if I’d changed the white balance in camera when shooting.
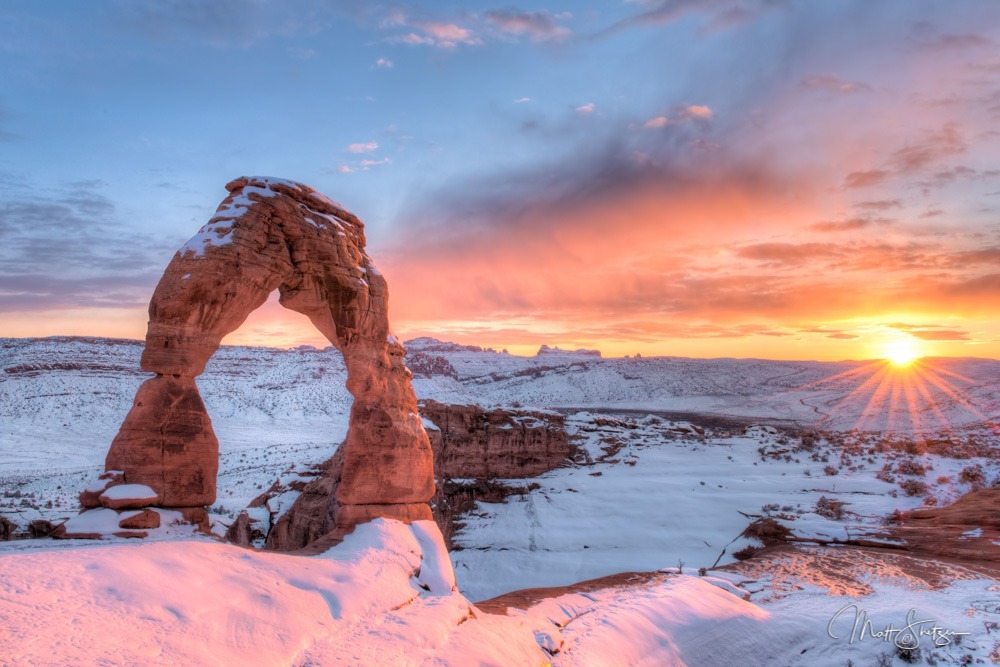
The correct white balance for this scene is 6000k.
Notice how the rocks and snow have a warm hue to them, as they should at sunset.
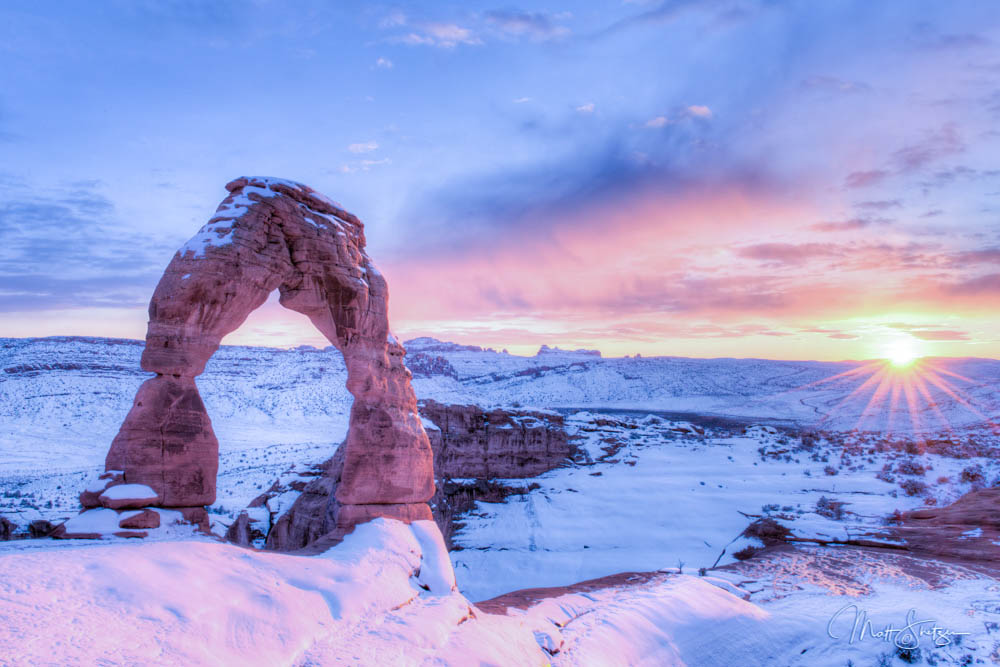
In this photo, the color balance has been set much cooler at 4000k. The snow has turned blue. The rock arch has lost its warm red hue, and looks muddy and faded.
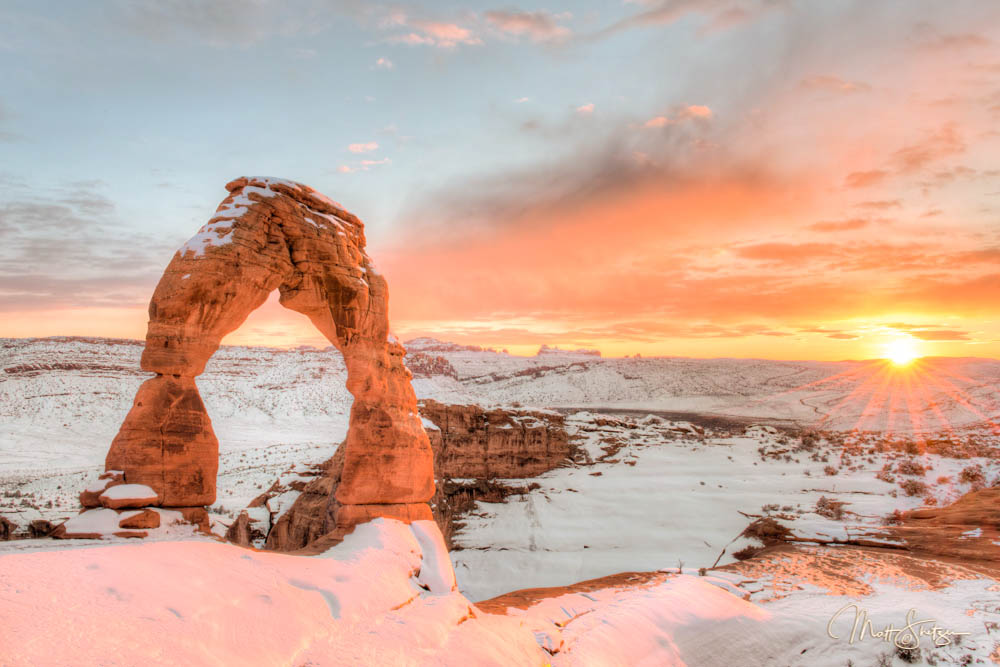
The white balance has been set warmer at 8000K. The rocks look red again, but now we’ve lost the blue in the sky. The snow has also become over-exposed, resulting in a loss of detail especially in the reds.
Note that you might want to intentionally seek out an “unreal” color balance in order to convey a particular tone or feeling. Though the three images above are all the same picture, most people shiver at the second one, and feel warm and relaxed when looking at the third. Photographers call this phenomenon color temperature: the ability of different color balances to express different moods while all being technically “accurate.” If you’ve ever played around with filters on Instagram, you’ll understand this right away.
In the table below, you’ll find white balance settings, their approximate K values, and the situations and moods they’re best for. Keep in mind that each camera manufacturer has slightly different white-balance numbers for each setting.
| White Balance Setting | Kelvin Value (K) | Best For |
| Tungsten | 3000K | Adding cool/blue tones to a picture; indoor areas lit by tungsten bulbs. |
| Fluorescent | 4500K | Adding cooler tones to a picture; indoor areas lit by fluorescent bulbs. |
| Flash | 5500K | The standard K value for a basic digital flash; daylight photos outdoors; indoor photos with lots of natural light. |
| Sunrise/Sunset | 5000K-6000K | Outdoor photographs taken just after sunrise or before sunset; adding warmth to a scene to maintain the warm mood. |
| Daylight | 5200K | Clear days outdoors. |
| Cloudy | 6000K | Partly cloudy and cloudy days outdoors; a warmer mood on cloudy days |
| Shade | 8000K | Photos under trees or canopies when you have a blue sky and you are not in direct sunlight. Very warm |
| Manual | 1000K-10000K | Choose your own value. This is the best way to take extremely low-light photos, such as by candlelight or night photography. Overtime you will learn what Kelvin (K) values you like and with manual white balance, you can set it directly. |
LESSON 3: RAW VS JPEG – TWO KINDS OF DIGITAL PHOTOS
Everything we’ve discussed until now is part of the universal photography experience (film and digital). For the next two lessons, we’ll be moving on to cover features of the digital photography era. In a short time, the art of photography has changed wildly — and while the fundamentals are still critically important, some extra knowledge is peculiar to digital work.
When shooting photos with a digital camera, you have the option to save the images in one of two formats: RAW or JPEG. If you work with computers, you might be familiar with other formats, like TIF, BMP, GIF, PDF, etc., but with digital photography, JPEG and RAW run the show.
The simplest way to state the difference is that JPEG is faster, while RAW is more thorough.
When shooting in RAW, your camera creates a digital image out of every single piece of visual information picked up by the sensors. Nothing is lost. The camera takes everything, and you decide what to keep. RAW is called the digital negative of digital photography as all the settings are overlaid on the image making post processing easier.
BENEFITS OF RAW IMAGES
- RAW images are higher-quality. Colors are more accurate (since you can modify white balance in post-processing), and have a higher dynamic range, which means they’re more likely to look good if you missed the white balance settings or exposure.
- RAW saves more data, which gives you more to work with in post-processing – and thus more control over the final product. Since JPEGs have less data, there are fewer things you can do to a JPEG photo with your processing software. If you get back home after a mountain shoot and realize your JPEGs all have the same flaw – say, bad color balance that makes the snow appear green – it’s much harder to fix the problem without damaging the image.
- RAW has lossless compression. RAW files are shrunk to save space on your memory card, but not so far that they sacrifice detail. JPEG compresses the photos much smaller, sacrificing quality in order to save space.
BENEFITS OF JPEG IMAGES
- JPEG photos are much smaller than RAW, so you can fit more of them on a single digital memory card due to their heavy compression. (In my opinion, with memory cards so cheap these days, this is not a huge advantage.)
- JPEGs come out of the camera already processed. Let’s say you’re shooting your daughter’s graduation ceremony, and you want everyone in the family to have the pictures the same night. Consider using JPEG, since those photos can be sent out right away. The downside of this is that certain settings, like white balance, cannot be changed after you capture the photo. Make sure you get them right the first time!
- JPEG is an open standard format. No matter what camera you used, and what software you have on your computer, you’ll be able to open and view your JPEG files. By contrast, RAW images require editing software like Photoshop or Lightroom just to view them. Many camera manufactures have free software that allows you to view their RAW image format; however, it’s hard to compete with JPEG when it comes to convenience.
Quick Tip
Shoot in RAW if you have more time to work on the photos and make them perfect. Shoot in JPEG if you need the photos to be ready immediately, or if you need to fit a lot on one memory card.Personally, I recommend shooting RAW anytime you have a choice. It offers significant benefits for both your photos and your knowledge of the craft. If you need the photos immediately, many cameras will let you shoot both RAW and JPEG at the same time.
LESSON 4: EXIF – YOUR CAMERA’S LOGBOOK
In the old days of film, photographers used to carry pencils and small spiral notebooks in their camera cases. Whenever we took a photo, we would write down some data about it: where it was taken, what the time and date was, what settings were used, and so forth.
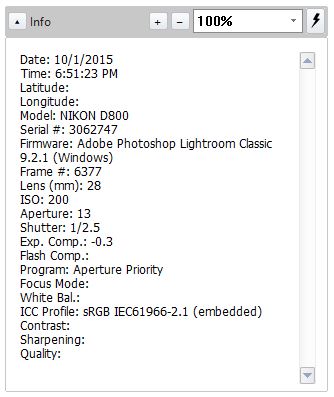
An example of EXIF metadata. Digital cameras store this record with every image.
In the digital age, all that is taken care of by EXIF data. EXIF, which stands for Exchangeable Image File Format, is a way for your digital camera to store the information you might have once written down in a logbook. This info contains important notes about a photo that don’t form part of the image itself, is called metadata.
Some examples of metadata include:
- Date and time
- Shutter Speed
- Aperture
- ISO
- Flash settings
- Shooting mode
- Exposure compensation
- White balance
- Event photographed
- Camera model
- Camera lens
- Location
- Image size
- …and so much more
When you open your photo files in a processing program like Lightroom or Photoshop, you’ll see the EXIF data saved along with the file. There are also programs that specialize in EXIF metadata, including one of my favorites, Photo Mechanic.
ASSIGNMENTS
ISO
Get to know your camera’s ISO performance. Take photographs at different high ISO settings and see how much noise you introduce. All cameras produce different noise levels at high ISO.
At midday, shoot the same scene with several different ISO settings, and compare the amount of noise in each picture. Go back and shoot the same subject in the evening, again with several different ISOs. Compare all the images.
Follow our Know Your Camera’s Performance tutorial, and master your camera’s ISO settings in the field.
WHITE BALANCE
A great way to experiment and learn white balance is to photograph the same subject at different settings. Find a scene that you like and shoot it with all the white balance presets on your camera — even the ones that don’t seem to make sense for where you are. Pay special attention to Daylight, Cloudy, Shade, and Auto. Compare the results on your camera’s display.
When you’re done, download your pictures and review them on your computer. If you shot RAW and have a photo editor, you can fine-tune the white balance after the fact. Play around with the settings and see what you can do. Keep in mind that these results will change depending on lighting conditions.
Want More?
Once you have finished, you might be craving more chances to test your skills. During our photography workshops, we go in-depth and teach our guests advanced techniques in the world's most beautiful locations, like Alaska, Costa Rica, Iceland, Colorado and Ecuador.
Each workshop has different topics and skill sets that are dedicated to the subjects at each spectacular location.
Learn more about our Photo Workshops at: https://www.shetzers.com/photo-tours/