
APERTURE, DEPTH OF FIELD AND SHUTTER SPEED
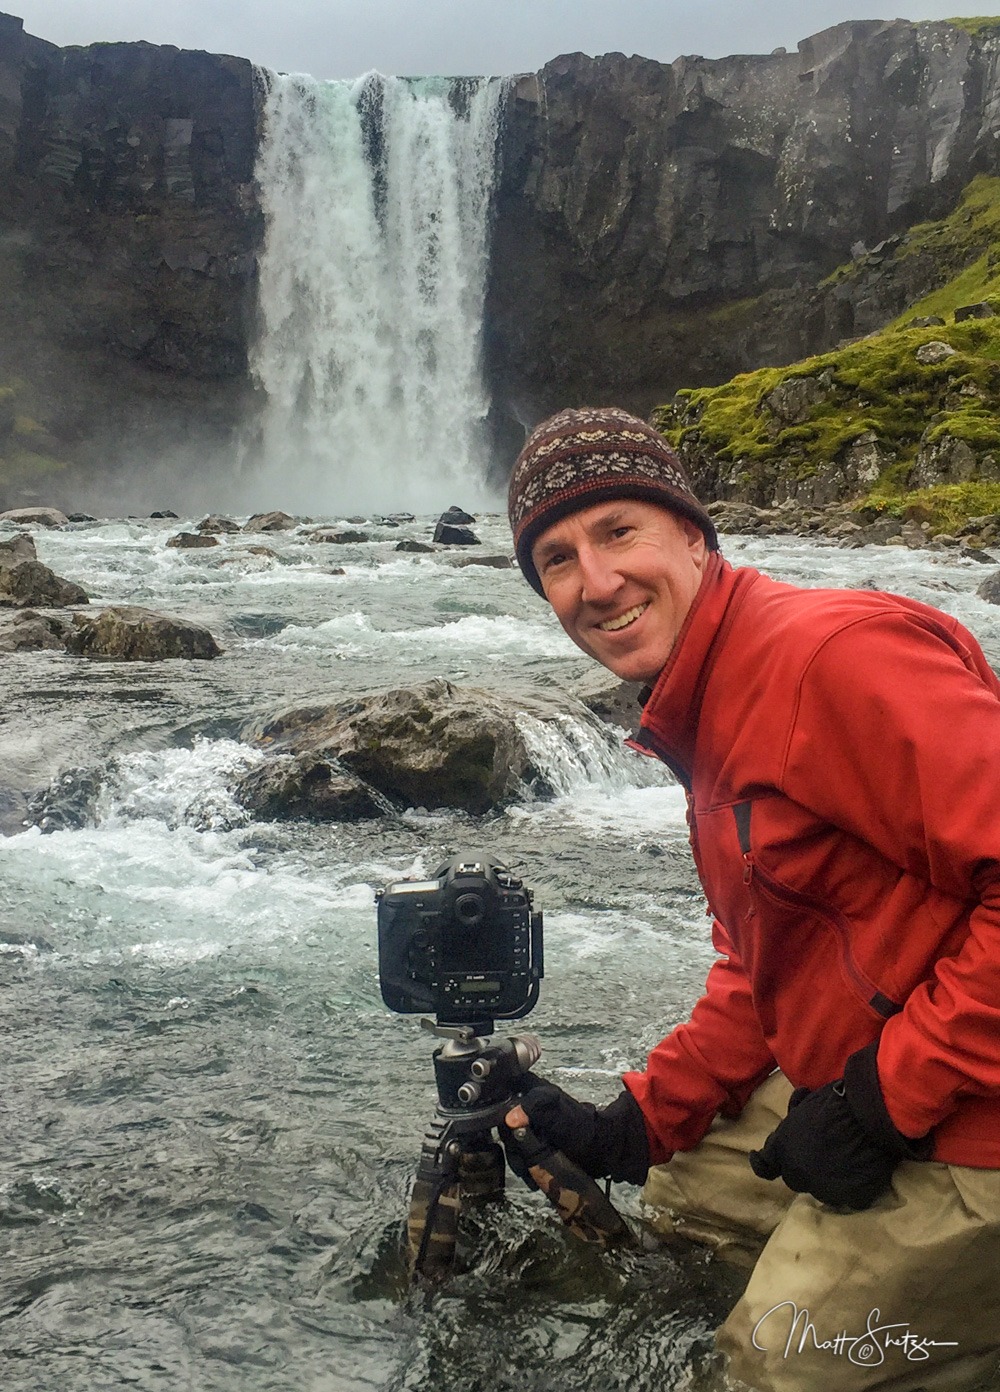
Matt getting a little wet for the shot
Hello, and welcome to the Fundamentals of Photography!
Thanks for signing up for my Fundamentals of Photography online course. When I sat down to write this course, I had one goal in mind: to write down everything I wish I had known when I picked up my first camera in 1986.
As a professional nature and wildlife photographer with decades of experience photographing beautiful vistas and shooting rare animals on many of the continents, I have seen many different techniques for photographers — but it is also very easy for folks who have been doing it for a long time to lapse into jargon.
Pros often rattle off paragraphs about auto-ISO and nifty fifties when all you want to know is the difference between aperture and shutter speed.
You will not find any unexplained jargon in this course. We will start at the very beginning. Each lesson builds on the concepts from the previous one, giving you a set of tools that will serve you in any situation.
This course has been written for cameras that let you control settings such as shutter speed and aperture. If you do not have one of these cameras, a lot of the concepts still apply — it can even be helpful to know the basics when all you have is a camera phone.
Whether you want to take stunning photos of the Galápagos Islands, or just get a beautiful image of the first dance at your daughter’s wedding, there is something in here for you.
LET’S GET STARTED!
This book is geared toward beginner and intermediate photographers, and covers topics in a progressive fashion.
Start by reading each chapter. At the end of each one, you will find assignments to complete using the skills you just learned. Experimenting with your camera is the best way to learn the techniques. Focus on getting familiar with each lesson before moving on to the next one.
Do not forget to download images you take onto your personal computer. On a computer, you will get a better sense of each picture’s quality and composition than you would on the camera LCD dispaly.
I strongly recommend sharing and discussing your images with others. It is a great way to get constructive criticism, make friends, and get over the fear of sharing your work in public. You do not have to agree with everyone’s comments as photography is a personal style, however listening and evaluating are the best ways to learn.
Feel free to come back to a chapter you have already completed if you need more practice. There is no deadline to finish this course. You will get more out of it if you are thorough than you will if you rush through.
Most of all, explore, experiment, and enjoy! Practice with a playful attitude, and you will not only become a better photographer…you might just discover the unique tricks that will form your personal style.
One final question: do you know what the best photo is? It’s the one that YOU like the most!
LESSON 1: APERTURE — LETTING THE LIGHT SHINE IN
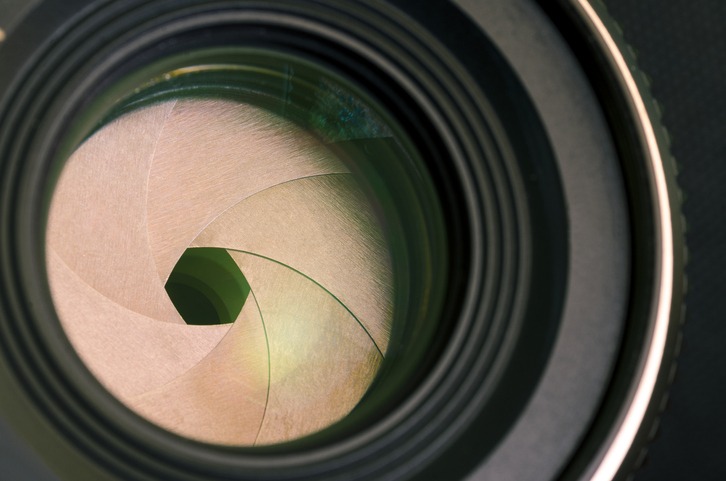
An example of camera lens aperture. Notice the small hole in the middle, which is approximately set at f/16.
Many of the mechanics of cameras, even modern digital cameras, are based on the human eye. What we “see” when we view an object is really light reflecting off that object. As light waves travel towards us, they pass through our pupil. It is an opening for light to enter our eye.
Aperture is like the pupil of a camera. The word comes from the Latin term for “opening,” which is exactly what it is: a gate for light to pass through.
The pupils of your eyes can change size. When you’re in a dark setting, they grow (dilate) to let in more light so you can see more clearly. When your environment is brighter, your pupils shrink (contract) so all the light doesn’t blind you. This is what’s happening when your eyes adjust to a light or dark room.
A camera’s aperture works exactly the same way. The size of the aperture is adjustable. That means you can control the amount of light the camera receives when taking a picture.
MEASURING APERTURE
Photographers measure light in units called stops. When a photographer says “stop it up,” they mean “let more light into your aperture.”
A stop is a comparative unit with no absolute value. Going up one stop means letting in twice as much light as before. Going up two stops lets in four times the light, three stops equals eight times the light, and so on.
Here’s an illustration of what this looks like:
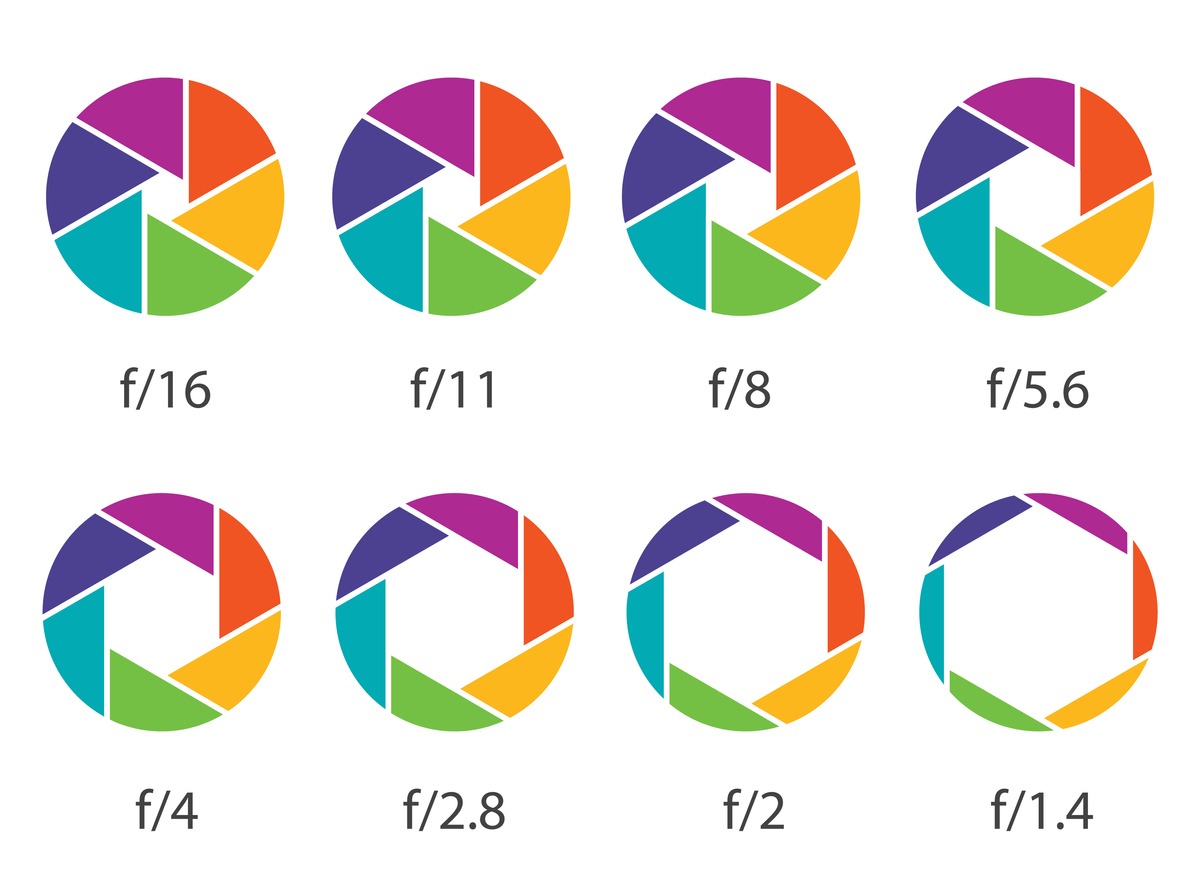
An illustration of different apertures, measured in f/stops. Since f/stop is a fraction, a smaller number after the slash equals a wider opening.
You’ll see stops again when we discuss ISO and shutter speed, but for aperture, we use a slightly different unit: f-stops. This stands for “fractional stops.”
A higher f-stop value equals a smaller aperture. This seems like it makes no sense, but think back to math class. A fraction is made up of a numerator and a denominator. The larger the denominator, the smaller the total value of the fraction. 1⁄2 is greater than 1⁄4, which is greater than 1⁄8, and so on.
On your camera, you’ll see some or all of the following aperture diameters, measured in f-stops: f/1.4, f/2, f/2.8, f/4, f/5.6, f/8, f/11, f/16, f/22, f/32. When you look at that, replace each “f” with the number 1.
f/1.4 lets in 1⁄1.4 stops compared to a totally open lens. f/2 lets in 1⁄2 a stop compared to an open lens. And so on.
Depending on the lens, you might see more or fewer of these. Not all camera lenses go down to f/1.4 or up to f/32.
Quick Tip
It’s all right if you didn’t get all that on the first read. All you need to know is:
Lower F-Stop Number = Larger Opening = More Light Comes In
Higher F-Stop Number = Smaller Opening = Less Light Comes In
That’s it. You do not need to memorize all the f/stops yet!
In general, you use a bigger aperture when shooting in less light, and a smaller aperture when shooting in more light. Adjust to your surroundings, just like your pupils do.
However, that’s not the only thing that changes along with your aperture size. As aperture size decreases, depth of field increases. This governs the clarity or focus of your picture.
In the next lesson, we’ll explain what we mean by depth of field.
LESSON 2: DEPTH OF FIELD (DOF)
When we discuss depth, we refer to the sharpness of each part of an image.
Again, photography is visual, so think about your eyes. If we focus our eyes on an object, the background turns indistinct. If we focus on the background, the objects closer to us shift out of focus instead. Your camera can do all that and more.
Try it! Hold up your hand and focus your eyes on it. Notice the background is soft and out of focus. Now, focus on the background, and observe how your hand fades out of focus.
To emphasize an image, and allow the background to fade out of focus, we use a shallower depth of field. To keep the entire image sharp (foreground and background) we use a greater depth of field.
Another way to say it: to sharpen a large scene or subject, increase the depth of field. To sharpen and emphasize a specific part of the scene or subject, decrease the depth of field. We abbreviate depth of field as DOF.
Here is where our aperture or f/stop measure comes in. Wide open apertures like f/2.8 produce very out-of-focus backgrounds, bringing attention to the subject. Closed apertures (say f/16) heighten detail in both the subject and the background.
Quick Tip
Shallow DOF = The subject is sharp, while the background softens. The lack of focus on the background draws attention to subject. Great for portrait photography, where you want the subject sharp and the background smooth and creamy. Example of f/2.8.
Greater DOF = The image is sharp from the foreground to the background. All parts of the image are in focus. Great for landscape photography when you want close-up subjects like flowers and distant background like mountains to have equal sharpness. Example of f/16.
Let’s talk about some examples, so you can see the effects of changing your aperture.
The below image of a roadrunner was shot at f/4 to produce a very soft background. This reduces visual clutter that might distract from the subject. If this had been shot at f/16, the background would be much more in focus, drawing the viewer’s eye away from the subject.
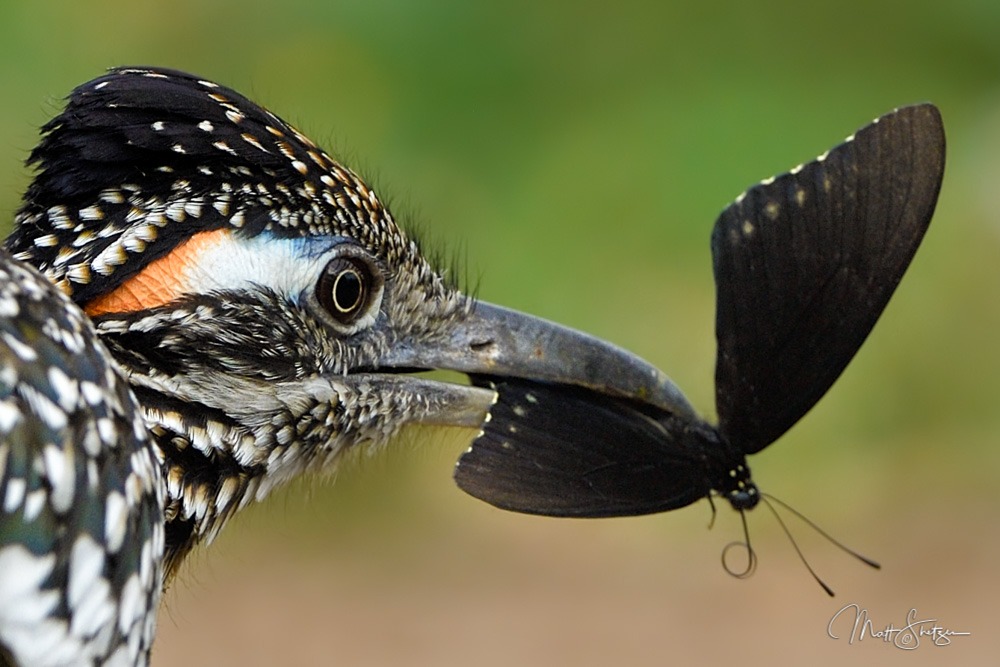
A Greater Roadrunner grabs a snack. Photographing at f/4 produces a nice creamy background that does not distract from the subject.
The Technical Details: Focal Length 600mm, Shutter Speed 1/1250sec, Aperture f/4, ISO 800, Exposure Program Aperture Priority Mode
Next, let’s look at a landscape image. The rocks in the foreground are of interest, but so is the historic mining mill perched on the cliff. To keep everything in focus, this was shot at f/16. If it had been shot at f/4 like the image above, we would miss out on part of the scene.
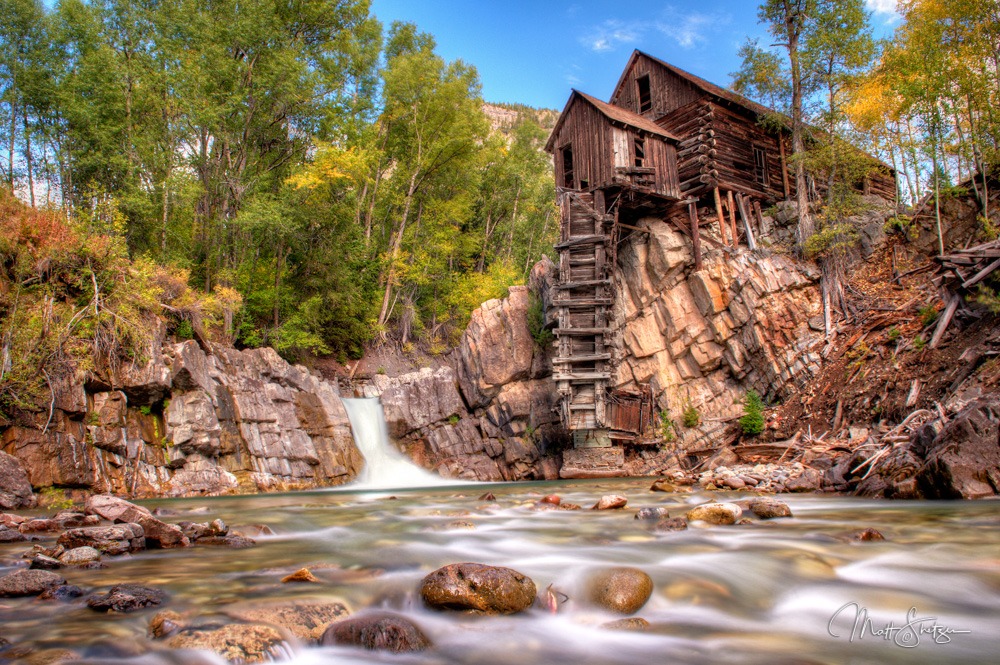
The historic Crystal Mill in the Colorado backcountry. Notice how the rocks in the foreground and the mill itself are all in focus, due to the depth of field created by an aperture of f/16. The illusion that the water is moving was achieved using a very long shutter speed which you’ll learn more about in the next lesson.
The Technical Details: Focal Length 17mm, Shutter Speed 6sec, Aperture f/16, ISO 200, Exposure Program Manual Mode
LESSON 3: SHUTTER SPEED
Other than aperture, there is another setting that dictates how much light enters the camera upon exposure. This is the length of time the shutter spends open, commonly called shutter speed. The longer the shutter is open, the more light can reach the sensor. Shutter speed impacts how motion is perceived in the image, creating motion blur when subjects are moving.
In other words, shutter speed affects two things: the amount of light in an image, and the blur or sharpness of any moving subjects. If your subject is moving fast, and your shutter is open for a long time, the subject will appear blurry in the image.
Motion blur is not always a bad thing. It’s a matter of personal preference. Some photographers prefer to freeze the action to get a clean picture, while others prefer a little motion blur so the viewer gets the feeling that the subject is in motion. For an example of motion blur, go back to the Crystal Mill photograph in Lesson 2, and notice how motion blur makes the water seem to move.
Quick Tip
Slower shutter speed = More light for the sensor = Moving subjects are more blurred
Faster shutter speed = Less light for the sensor = Moving subjects look sharper
Typical shutter speed settings (not a comprehensive list): 1⁄1000, 1⁄500, 1⁄250,1⁄125, 1⁄60,1⁄30,1⁄15, 1⁄2, 1
Each of these settings means a length of time in seconds. On a “1⁄15” setting, the shutter opens and closes within one-fifteenth of a second for each exposure. When set to “1″ the shutter is open for a whole second.
If you haven’t figured it out by now, I’m addicted to photographing bald eagles. Their looks and behavior make them fun subjects, but they are also a challenge due to how fast they move. This makes them a great example of the importance of shutter speed.
The image below was shot at 1/1250 exposure (meaning the shutter was open for 1/1250 of a second). At this speed, a very little bit of motion blur appears on the tips of the eagle’s wings.
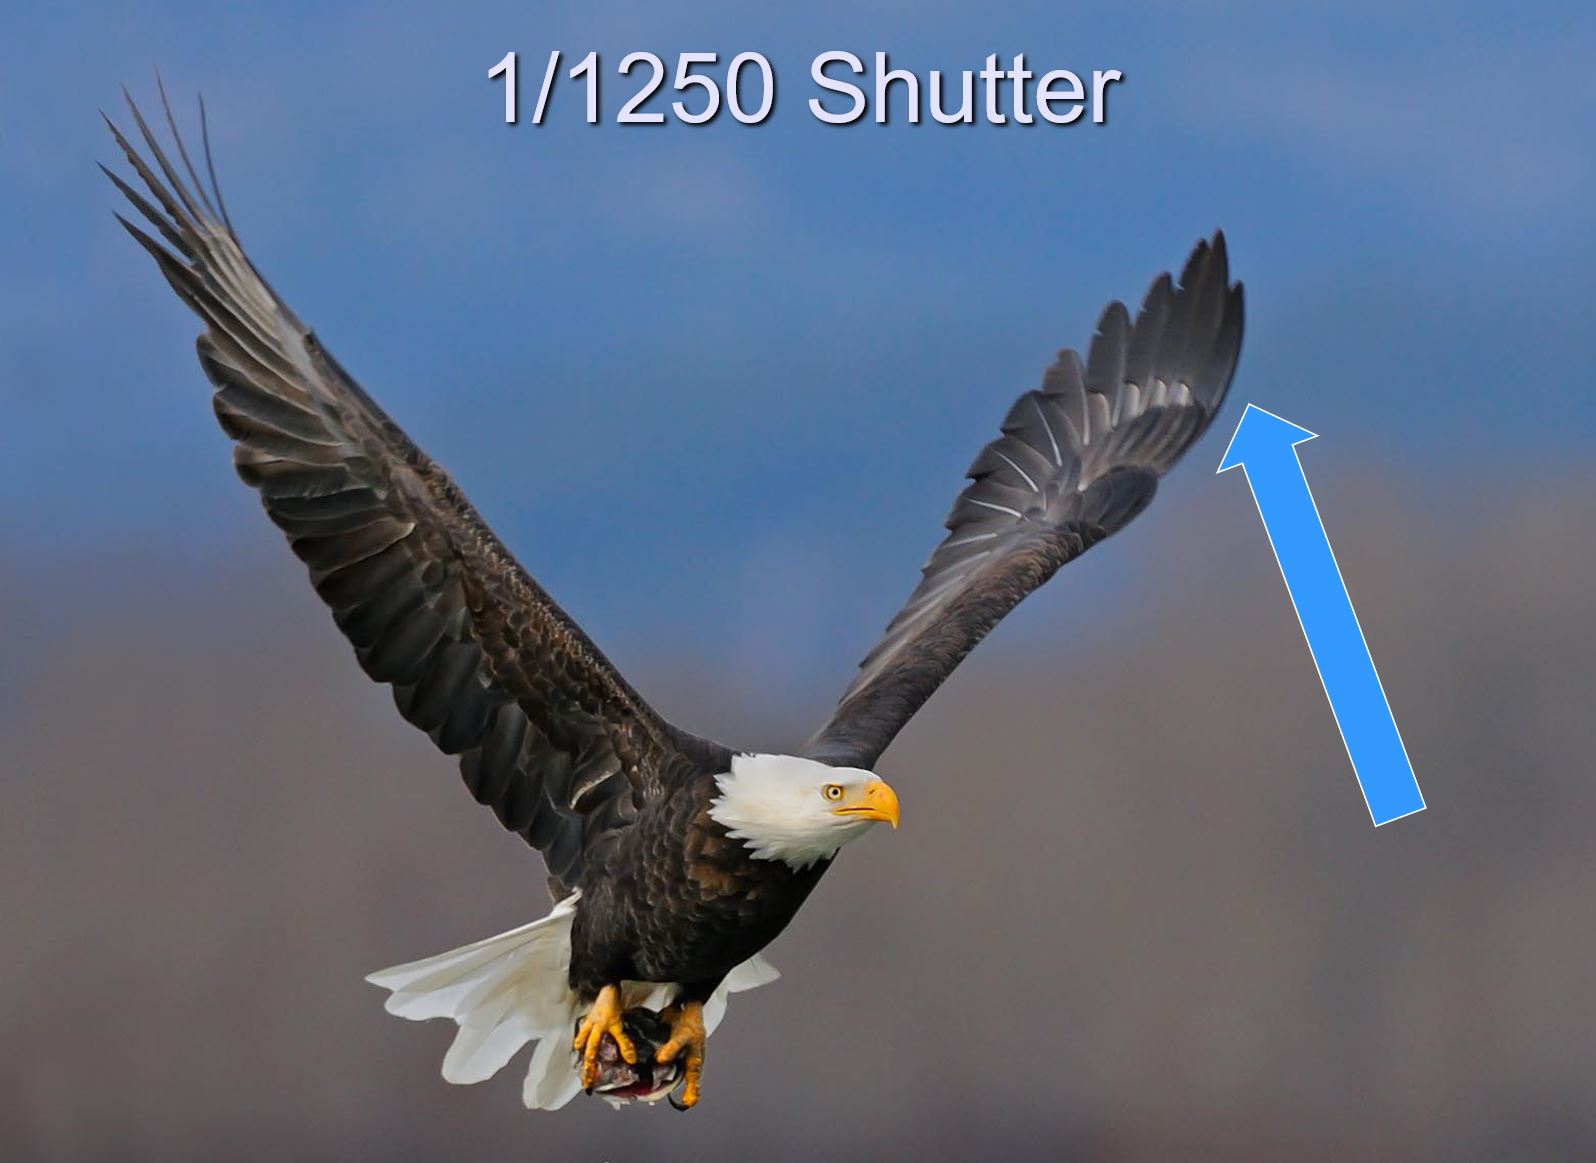
Notice the little bit of motion blur at the tip of the wing, indicated by the blue arrow.
The Technical Details: Focal Length 500mm, Shutter Speed 1/1250sec, Aperture f/5.6, ISO 800, Exposure Program Manual Mode
If I had wanted to remove motion blur altogether, I would have raised my shutter speed to 1/2000 second. Note that these aren’t universal numbers — I arrived at them after spending a lot of time watching how quickly bald eagles move and reviewing my images. With subjects that move at different speeds, you’ll need different shutter speeds for the same results.
The next image drops the shutter speed to 1/800 second. Notice how much more motion blur there is on the tips of the wings.

The shutter speed is reduced to 1/800 second, causing more visible motion blur.
The Technical Details: Focal Length 500mm, Shutter Speed 1/800sec, Aperture f/4, ISO 800, Exposure Program Manual Mode
By experimenting with shutter speed, I managed to photograph this next eagle at 1/125 second. The huge amount of motion blur gives the viewer a sense of the eagle’s motion. I would not normally recommend shooting subjects like eagles at 1/125 second, but photography is all about learning the rules in order to break them.
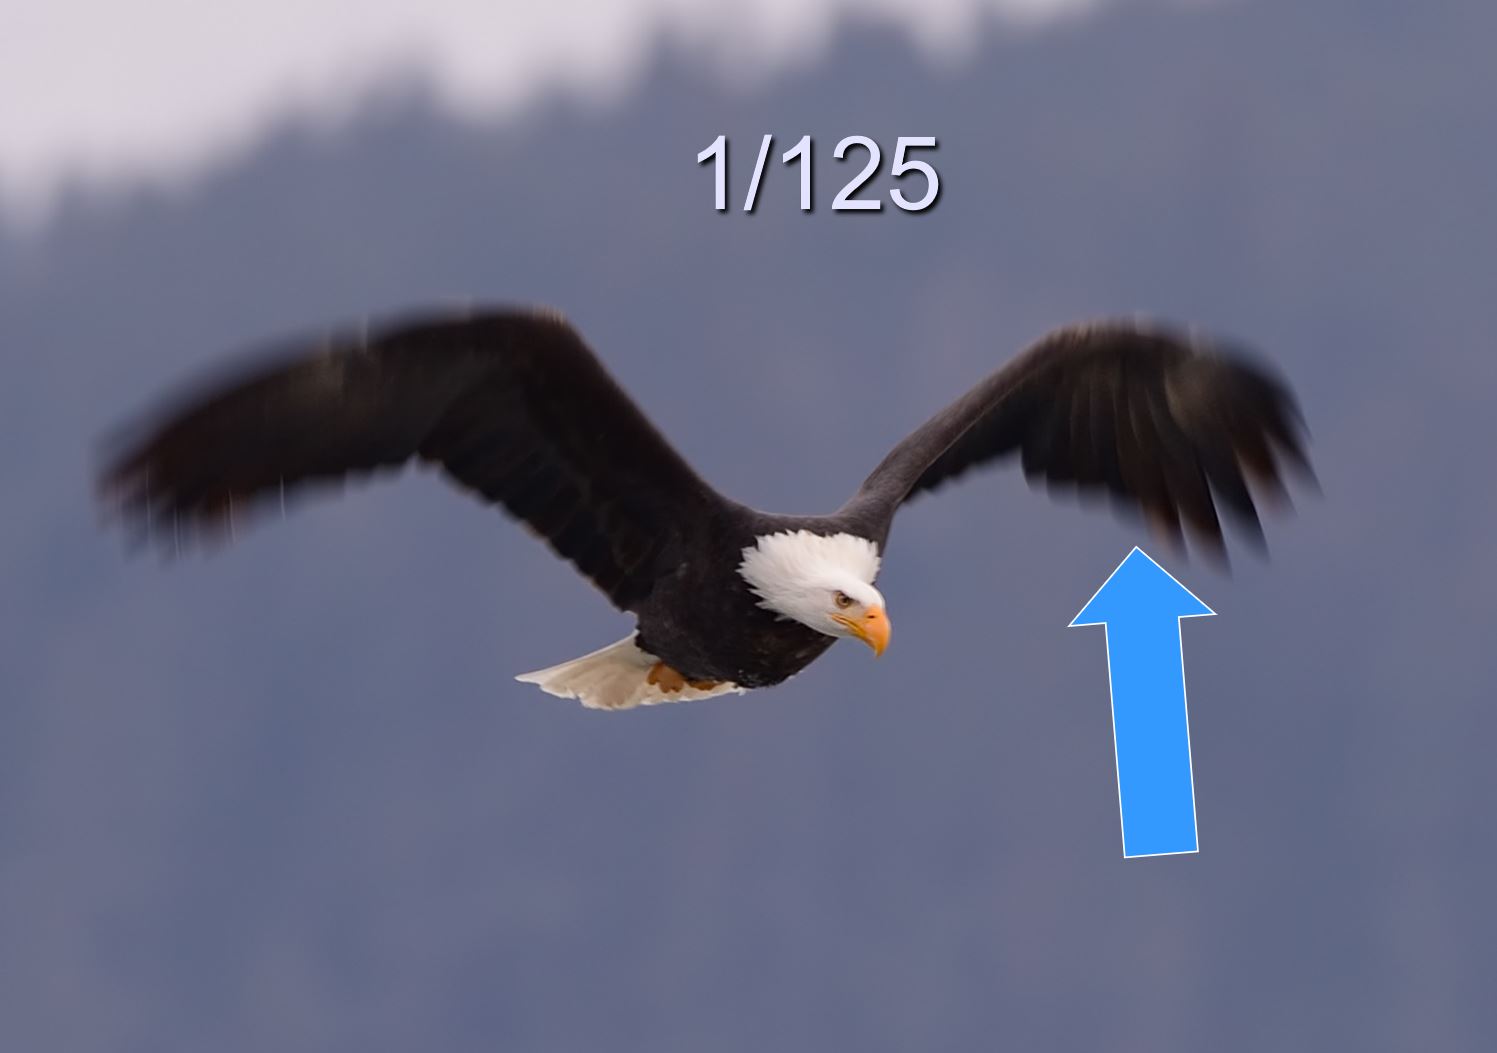
How low can you go? When your subject moves fast, try seeing how low you can set your shutter speed. As a bonus, your photos will be better-lit on overcast days.
The Technical Details: Focal Length 600mm, Shutter Speed 1/125sec, Aperture f/8, ISO 640, Exposure Program Manual Mode
We have been discussing fast-moving objects, but now let’s switch gears, and learn dragging our shutter speed can produce motion in still landscape photographs.
In the image below, look closely at the white water breaking on the shore. By reducing my shutter speed to 1/2.5 second, I was able to produce the illusion of motion in the waves breaking on the shore. If I had wanted a more frozen look for the water, I could have increased my shutter speed. All of this comes down personal preference.
A slower shutter speed makes the water appear to be moving as it breaks on the shore.
The Technical Details: Focal Length 12mm, Shutter Speed 1/2.5sec, Aperture f/16, ISO 200, Exposure Program Manual Mode
Our next example image is a night shot. Since it’s dark, we need to let more light into the sensor, but that’s not a problem — the mountain isn’t flying away. Using a steady tripod, the shot below was exposed for 25 seconds to let lots of light in. I even got a nice side effect, as the slow shutter speed makes the water appear to flow.
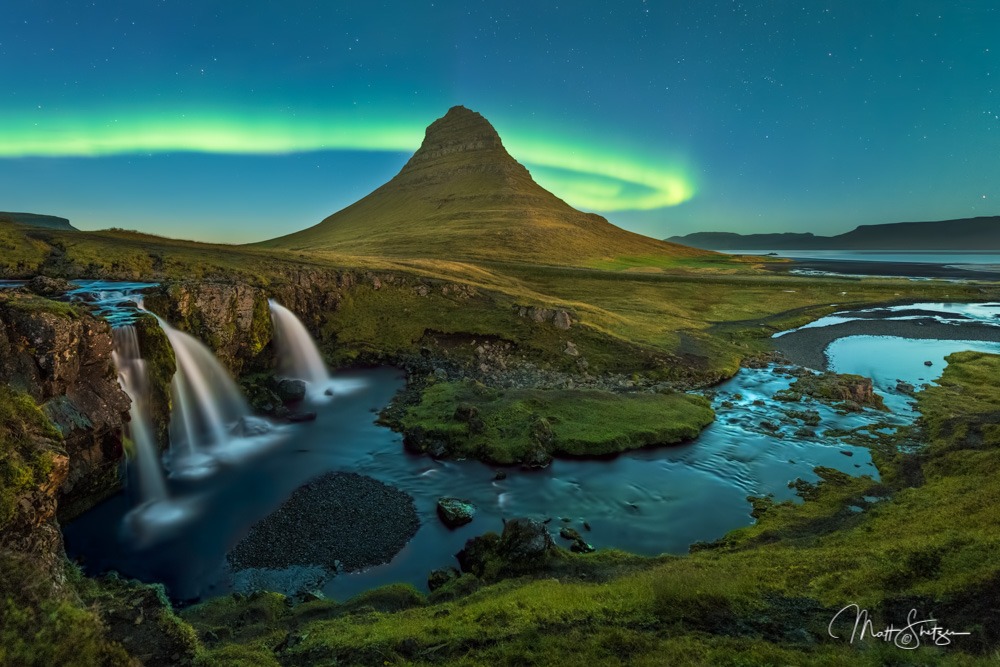
A 25-second exposure gathers plenty of light into the sensor, taking a clear photo even during a dark night.
The Technical Details: Focal Length 14mm, Shutter Speed 25sec, Aperture f/2.8, ISO 3200, Exposure Program Manual Mode
Now it’s time to have a little fun. The next image shows neon-lit boats zipping up and down the Nile River in Egypt. I left the shutter open for 30 seconds, as boats zipped in and out of the frame, creating the ghosting effect you can see below. Photography is about creativity, and experimenting like this is a huge part of the fun!
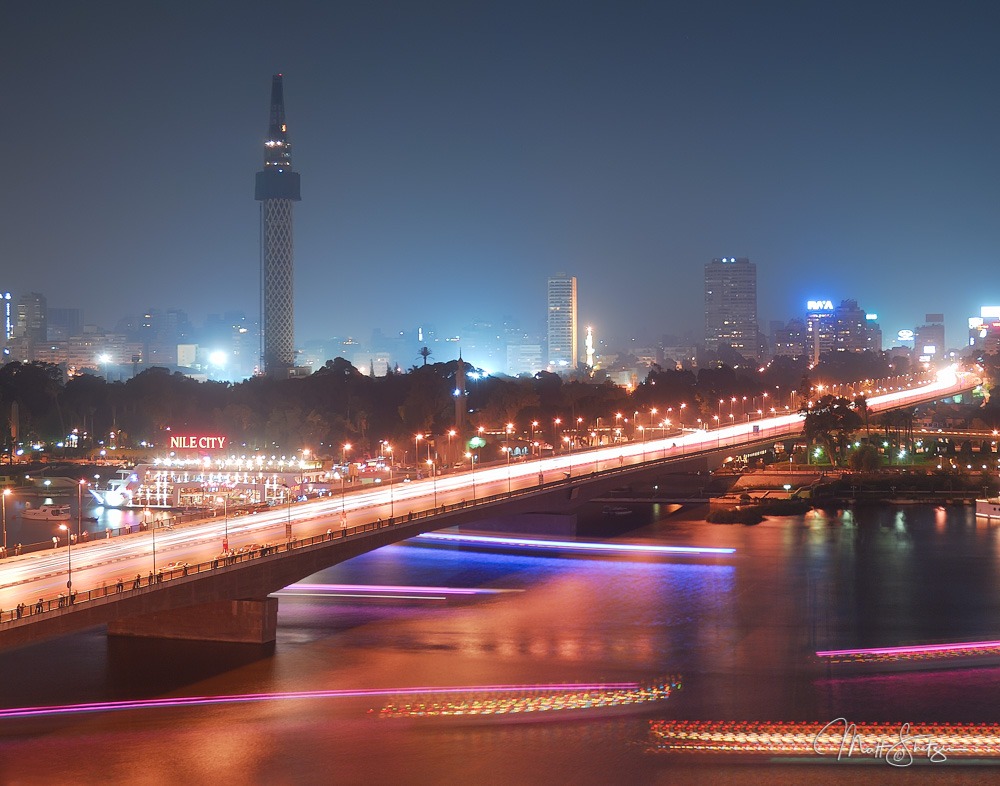
A long 30-second exposure shows boats ghosting up and down the Nile
The Technical Details: Focal Length 25mm, Shutter Speed 30sec, Aperture f/5.6, ISO 100, Exposure Program Manual Mode
Stops of light also apply to shutter speeds, with the same ratio of doubling the amount light with each stop. 1⁄500 is one stop darker than 1⁄250, and so on.
LESSON 4: PUTTING IT ALL TOGETHER
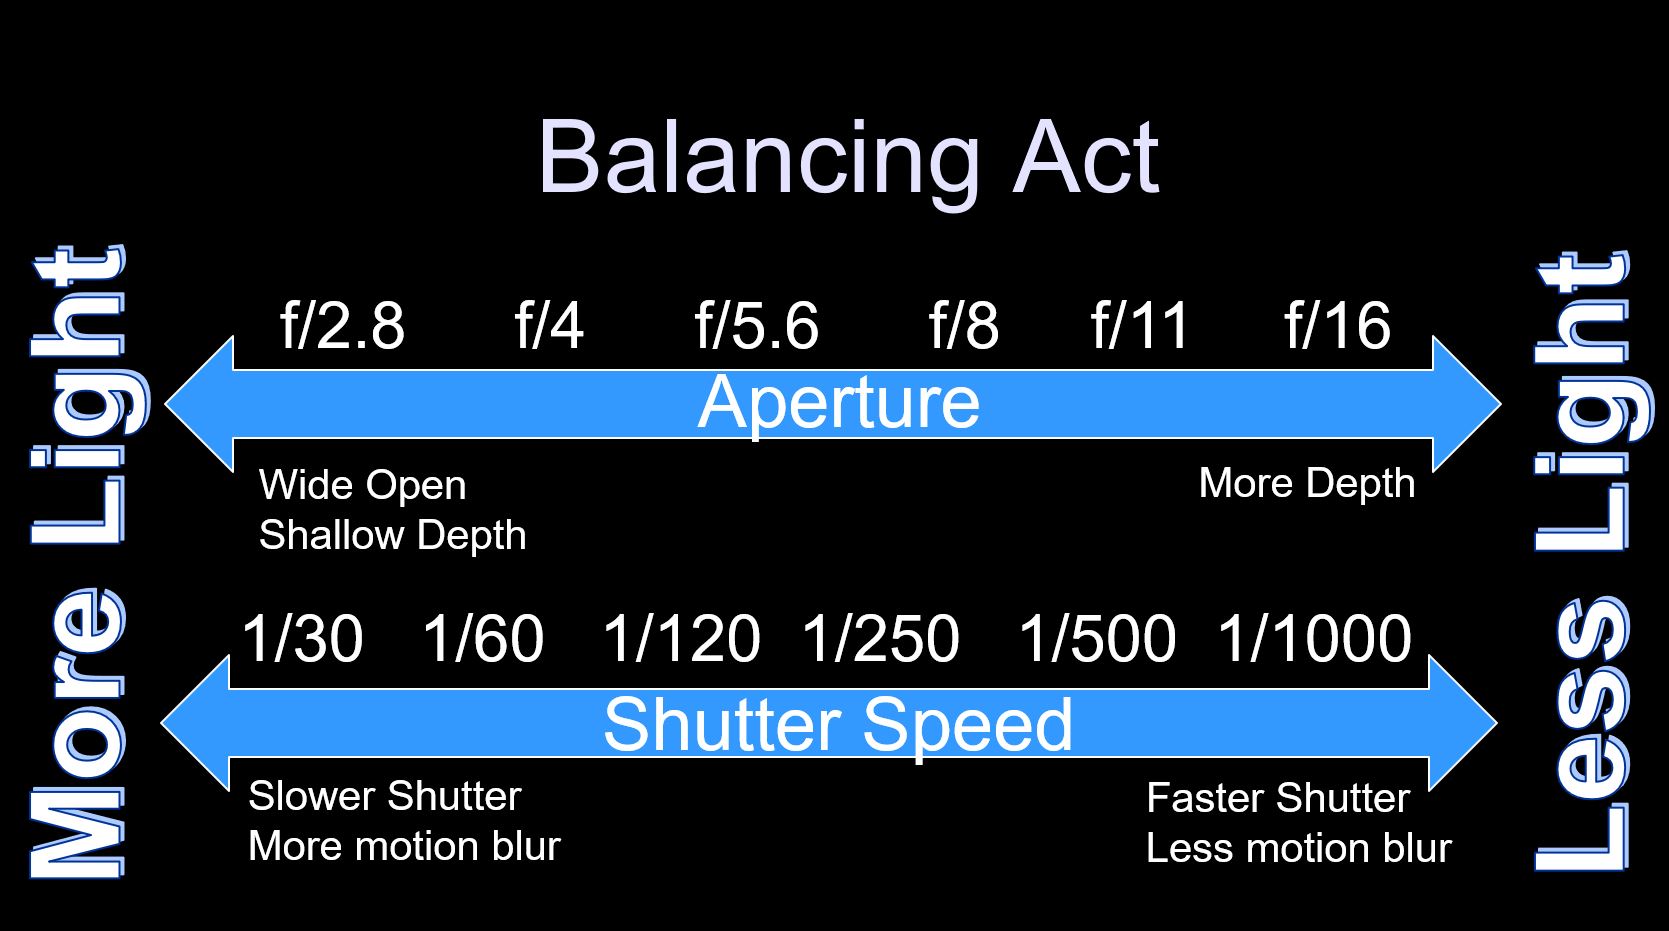
Aperture and Shutter Speed work in concert to determine the amount of light that reaches the camera’s image sensor during each exposure.
HOW TO USE APERTURE AND SHUTTER SPEED TOGETHER
Say we want a given amount of light for an image. If the aperture is opened by one f-stop, twice the amount of light hits the sensor. The shutter speed can then be cut in half to keep the amount of light entering the camera the same.
If the Aperture is closed by one f-stop, half the amount of light enters. The Shutter Speed can now be doubled in length to keep the amount of light the same.
The below graphic shows the relationship between the Aperture and Shutter speed.
ASSIGNMENTS
I wanted to pose a couple of questions to start you thinking about which settings you would use in different scenes. Think about each questions, and then click the answer box to display the answer.
APERTURE
- You have a landscape scene that you would like to photograph. The foreground and background are both interesting. Would you use a wide open aperture (low number) or a narrow aperture (high number)?
- You are taking a portrait of a family member against a distracting background. Would you use a wide open aperture (low number) or a narrow aperture (high value)?
- Your camera has a landscape mode on it. Do you think it will set the aperture wide (low number) or narrow (high number)?
SHUTTER SPEED
- Your camera’s shutter speed is displayed as 500. Does this mean 1/500 second or 500 seconds?
- You decide you would like to photograph some backyard birds. Do you use a fast or slow shutter speed?
- If you see lots of motion blur in your image, and you would prefer to not to have any, what should you do?
Congratulations, you made it through the first chapter! That is a huge accomplishment. As we continue, everything will get easier and easier.
Want More?
Once you have finished, you might be craving more chances to test your skills. During our photography workshops, we go in-depth and teach our guests advanced techniques in the world's most beautiful locations, like Alaska, Costa Rica, Iceland, Colorado and Ecuador.
Each workshop has different topics and skill sets that are dedicated to the subjects at each spectacular location.
Learn more about our Photo Workshops at: https://www.shetzers.com/photo-tours/